Introduction
 Xero is well known Cloud based Accounting Software. In this post you will learn how to implement Xero API Integration with SQL Server or any other RDBMS (e.g. Oracle, MySQL, Postgresql) using SSIS in few clicks. We will use SSIS JSON Source Connector to Read data from Xero and Load into SQL Server / other target (Using OAuth Connection). We will also discuss reverse scenario to Write data to Xero (API POST for Insert or Update in Xero) using SSIS Web API Destination and SSIS JSON Generator Transform
Prerequisites
Before we look into Step-By-Step section to extract and load data from Xero to SQL Server let’s make sure you met following requirements.
- SSIS designer installed. Sometimes it is referred as BIDS or SSDT (download it from Microsoft site).
- Basic knowledge of SSIS package development using Microsoft SQL Server Integration Services.
- ZappySys SSIS PowerPack installed. Click on the link to download FREE trial.
- You have basic familiarity with REST API concepts and Xero API.
Concepts of Xero REST API
API Authorization
Before you can access Xero API you must register account and App. There are 3 types of Apps to access Xero API.
- Private App (X509 Certificate used to sign requests)
- Public App (Use 3-legged OAuth. Token expires in 30 mins and then you have to authorize again from UI)
- Partner App (Use 3-legged OAuth. Token expires in 30 mins.. but refresh token supported to get new token for unlimited times without Authorization via Login UI)
- OAuth2.0 Authentication (Recommended)
In this article we will use Private App to access your company data in Xero.
Data formats
Xero API supports Xml and JSON both formats over the same URL (endpoints). If you want data in JSON format then you have to pass following Header (else data in Xml format will be returned). If you are using SSIS JSON Source Connector then make sure following header is added. For SSIS XML Source no need to add this header.
|
1 |
Accept : application/json |
Step-By-Step : Xero API Integration in SSIS
Now lets look at steps needed to fetch data from Xero and load into SQL Server.
Configure OAuth2.0 Connection for Xero API (Recommended)
So let’s how to create the Xero OAuth2.0 connection. For more on OAuth2.0 refer to this article.
- Right-click inside the Connection Managers area again and click “New Connection…”
- From the connection type list select “ZS-OAUTH” connection type.
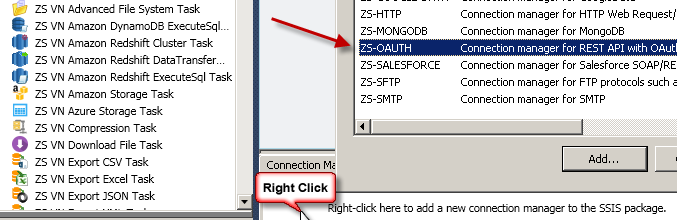
Create new SSIS OAuth API Connection Manager
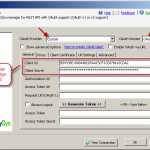
- Select OAuth Provider which Custom, enter the CleintID and Secret and set the URLs as below and desired scopes that are required for the API Call.
Auth URL:
Token URL:1https://login.xero.com/identity/connect/authorize
Scopes: Add your desired scopes based on your API call requirements.1https://identity.xero.com/connect/token
Note: To get a refresh token, you must request the offline_access scope. A refresh token allows you to refresh your access token and maintain an offline connection.
offline_accesshttps://developer.xero.com/documentation/guides/oauth2/scopes/#offline-access
OAuth2.0 Connection
- Now go to the Advanced tab and set the redirect URL as below and also you need to set the same URL in the Xero API App.
1https://zappysys.com/oauth2
Set Callback/Return Url in OAuth Connection
- Now Click on the Generate Token Button and logged in with Xero username and password and grant permission.
- That’s it your token is generated. If you got the blank Screen like this after following all the steps. Close that window.
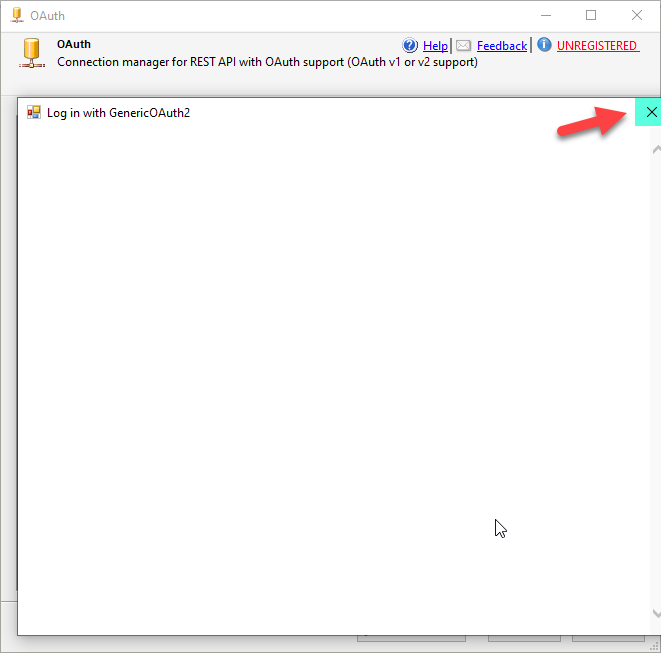
OAuth2.0 connection : Blank Window at last
- And it will ask you to use the Different Method to generate the Token using system default browser click on YES.

Different Method to generate the Token using system default browser
- It will open the URL in the browser there you need to log in and grant the permission.
- After that, you will able to view the access token in the browser. you can copy from there also.
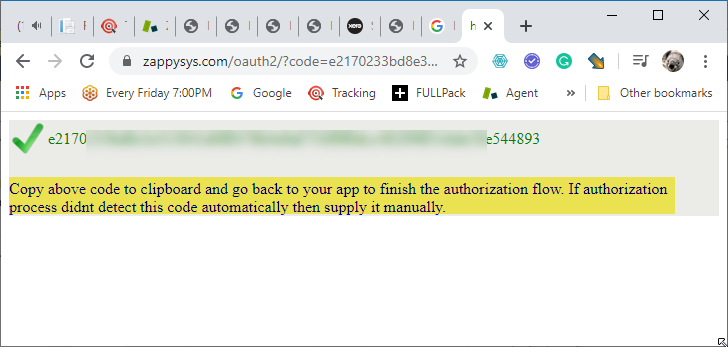
Generated Token
- At the last, it will again focus on the connection and there it will ask you to save the token if you want to store it. if not then you can manually copy and paste that token.
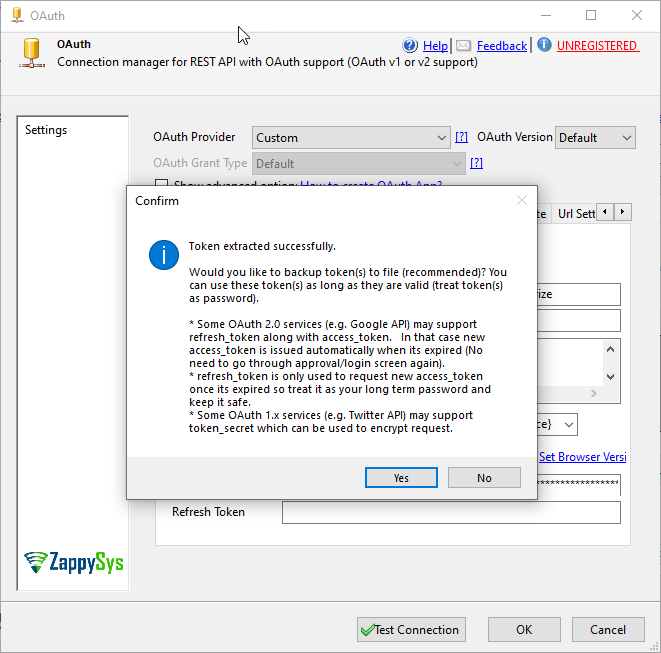
OAuth Connection : Store the Tokens
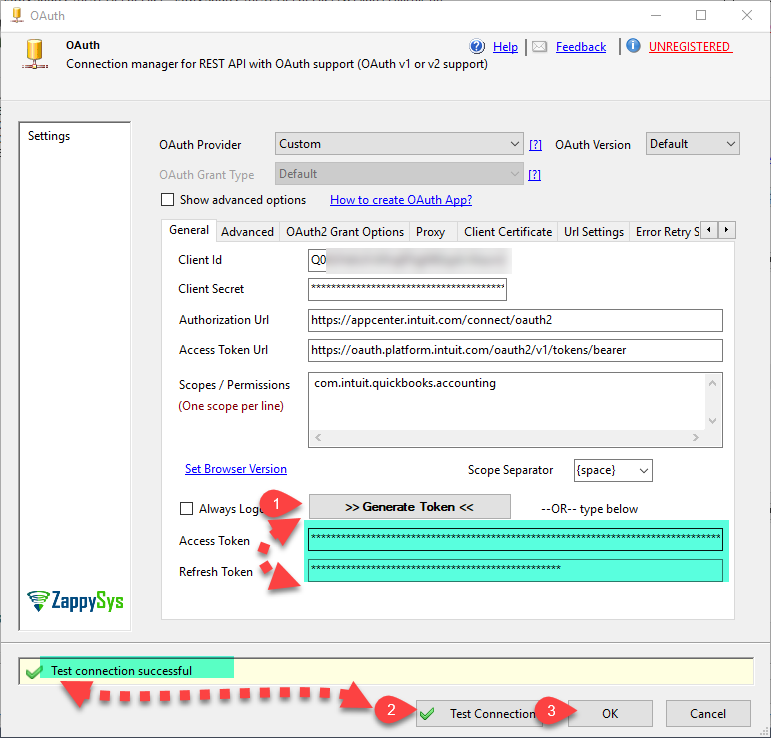
- That’s it now click on the Test Connection button to test it.

Generate Token and Test Connection
Register OAuth App Private for Xero (Private App) OAuth Connection (Depreciated)
Here is how to configure Xero to use Private App (click on below link).
https://developer.xero.com/documentation/auth-and-limits/private-applications
In the above link during these steps openssl command may throw error about openssl.cnf is missing or cannot load. If you face such error then don’t worry just refer to following workaround.
Basically you can either supply config file path in each command OR set path by issuing SET command before any other command. See below examples (Assuming you installed OpenSSL to c:\OpenSSL-Win64 folder)
|
1 |
c:\OpenSSL-Win64>openssl req -x509 -config "C:\OpenSSL-Win64\bin\openssl.cnf" |
— OR — type before command before any other openssl commands
|
1 2 3 |
c:\OpenSSL-Win64>set OPENSSL_CONF=c:\OpenSSL-Win64\bin\openssl.cnf c:\OpenSSL-Win64>openssl req -x509 -config "C:\OpenSSL-Win64\bin\openssl.cnf" |
Once you generate public key, private key and, pfx file we are ready to call Xero API in SSIS
Configure Xero (Private App) OAuth Connection
Once you generate certificate using openssl and register Private App for Xero we are ready to move to SSIS piece. Lets see how to do that.
- Open Visual Studio
- Open existing SSIS Project or create new using File > New > Project > Choose “Integration Services Project” Type under Business Intelligence template category
- Open Package
- Right click inside Connection Managers area and click “New Connection…”
- From the connection type list select “ZS-OAUTH” connection type.

Create new SSIS OAuth API Connection Manager
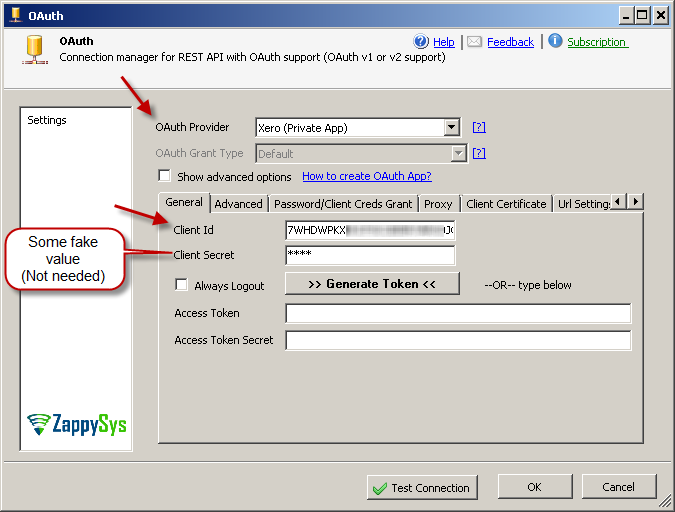
- On the connection select “Xero (Private App)” from Service Provider Dropdown
- Enter Client ID (Obtain this from App created in Previous section) App Selection leave “Use Default OAuth App” selected. If you created custom OAuth App then select “Use Custom OAuth App” Option
- Enter some fake value in Client Secret (not needed when you use Private App). Secret will come from certificate file like below.
SSIS OAuth Connection – Configure Xero API Connectivity using Private App (Certificate File Approach)
- Now go to Certificate tab and Check Use Certificate Enter, Enter certificate location and password like below.
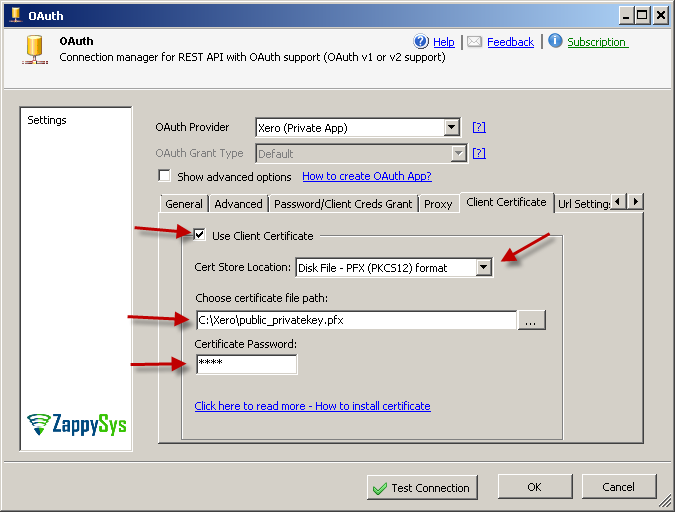
SSIS OAuth Connection – Configure X509 Certificate File Option for Xero Private App (Select PFX file)
- Click OK to save OAuth connection manager


So in the next section from the upper connections, we need to use any of the one connection only for Xero API now let’s try to read data from Xero using SSIS JSON Source.
Xero recently added OAuth 2.0 support so that now recommended way to use as Connection.
Configure JSON / REST API Source – Read data from Xero
Now let’s look at how to configure SSIS JSON Source to read data from Xero API
- In the control flow ssis toolbox Drag and drop data flow task
- Double click Data flow
- Drag ZS JSON Source (REST API or File) from SSIS Toolbox and drop on Data flow designer
- Double click ZS JSON Source to configure it.
- Set the following properties
- Enter URL
1https://api.xero.com/api.xro/2.0/Invoices - Check Use Credentials and select OAuth connection we created in the previous section
- For Headers grid. Click on Raw Edit button and remove enter following (remove default headers)
1Accept: application/json - Click on Select filter and select an array node as below to generate filter expression (e.g. $.Invoices[*] )
- Enter URL

Configure SSIS JSON /REST API Source – Read Xero Invoices
Also, add following header in case of multiple tenants are being used in XERO environment –
|
1 |
xero-tenant-id: <TENANT ID FROM XERO> |
Configure Xero REST API Pagination in SSIS JSON Source
By default, Xero may not send you all records and you may have to setup pagination to read more data after the first response.
For example, you like to read LineItems from Invoices. For that make sure you use below URL and include page=1 to start with. If you do not include page=1 then Line items are not returned (Yes its ODD but clearly documented here).
- Enter URL as
1https://api.xero.com/api.xro/2.0/Invoices?page=1 - Select Filter as $.Invoices[*].LineItems[*]
- Go to Pagination tab
- Select Pagination by URL Parameter
- Enter page as pagination parameter name like below
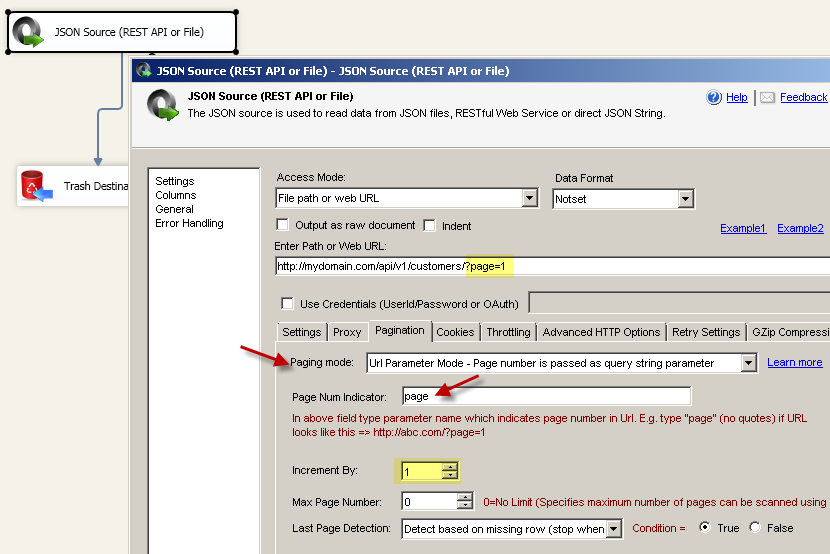
REST API Looping/Pagination via URL Page Number Parameter (Loop until last page detected)
- Click OK to save
Now when you run package you will see all LineItems for each Invoice will be returned.
Loading Xero data to SQL Server
Now last step is loading Xero data to SQL Server. For example purpose we will load data into SQL Server but you can load into any Target (e.g. Flat file, Oracle, Excel) using Microsoft or ZappySys Destination connectors
To load Xero data into SQL Server perform following steps
- Drag OLEDB destination on Data Flow surface
- Connect ZS JSON Source to Destination
- On OLEDB destination select / create new SQL Connection and then Click “New Table”
- Click on Mappings tab and click OK to save
- Execute Package

Configure SSIS OLEDB Destination – Loading Xero Data into SQL Server Table

Xero to SQL Server Column Mappings for OLEDB Destination

Loading Xero data to SQL Server in SSIS
POST data to Xero (Insert or Update)
So far we have seen how to read data from Xero. Now let’s look at how to write data to Xero.
There are two ways you can achieve this.
- Use Web API Destination in Data Flow
- Use REST API Task in Control Flow
Read this article to learn more about API POST using SSIS
Using SSIS Web API Task (Write data from SQL Server to Xero)

Using REST API Task to POST data to Xero
If you have JSON/XML data already prepared and if you like to POST it to Xero API then REST API Task would be easy to use.
REST API Task Body can be direct string, variable (e.g. {{User::varSomeData}} or Body can come from File

SSIS REST API Task – POST data to Xero (Create contacts)
Read data from Xero Report API
In previous examples we saw how to read data from various Xero API endpoints but now lets look at how to call Xero Report API. For example if you like to extract data displayed in below then you can extract it in Xml or JSON format. Below report is in HTML format but we will show you how to get similar information in JSON format and load into SQL Server Table.

Xero Report Example – View Profit and Loss Report in Xero Portal
To extract above information you can call below API Endpoint (e.g. Profit & Loss Report)
|
1 2 |
GET https://api.xero.com/api.xro/2.0/Reports/ProfitAndLoss?fromDate=2017-02-01&toDate=2017-02-28 |
You can use Variables to make above URL dynamic in JSON Source as below
|
1 |
https://api.xero.com/api.xro/2.0/Reports/ProfitAndLoss?fromDate={{User::StartDate,yyyy-MM-dd}}&toDate={{User::EndDate,yyyy-MM-dd}} |
Each report has its own API URL so make sure you refer to the connect URL for calling different report.
Here is sample response from API
|
1 2 3 4 5 6 7 8 9 10 11 12 13 14 15 16 17 18 19 20 21 22 23 24 25 26 27 28 29 30 31 32 33 34 35 36 37 38 39 40 41 42 43 44 45 46 47 48 49 50 51 52 53 54 55 56 57 58 59 60 61 62 63 64 65 66 67 68 69 70 71 72 73 74 75 76 77 78 79 80 81 82 |
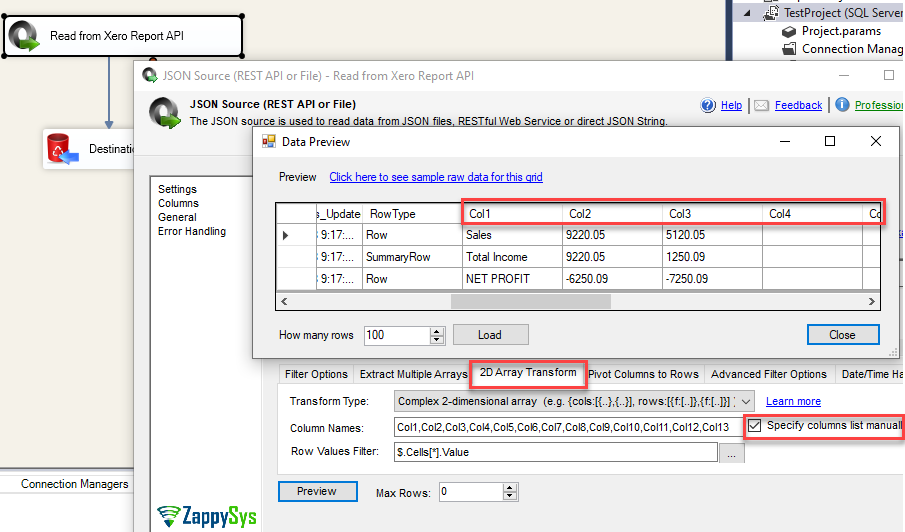
{ "Reports": [ { "ReportID": "ProfitAndLoss", "ReportName": "Profit and Loss", "ReportType": "ProfitAndLoss", "ReportTitles": [ "Profit & Loss", "Demo Company (AU)", "1 February 2018 to 28 February 2018" ], "ReportDate": "25 February 2018", "UpdatedDateUTC": "\/Date(1519593468971)\/", "Rows": [ { "RowType": "Header", "Cells": [ { "Value": "" }, { "Value": "28 Feb 18" }, { "Value": "28 Jan 18" } ] }, { "RowType": "Section", "Title": " Income", "Rows": [ { "RowType": "Row", "Cells": [ { "Value": "Sales", "Attributes": [ { "Value": "e2bacdc6-2006-43c2-a5da-3c0e5f43b452", "Id": "account" } ] },{ "Value": "9220.05", "Attributes": [ { "Value": "e2bacdc6-2006-43c2-a5da-3c0e5f43b452", "Id": "account" } ] },{ "Value": "5120.05", "Attributes": [ { "Value": "e2bacdc6-2006-43c2-a5da-3c0e5f43b452", "Id": "account" } ] } ] }, { "RowType": "SummaryRow", "Cells": [ { "Value": "Total Income" }, { "Value": "9220.05" }, { "Value": "1250.09" } ] } ] },{ "RowType": "Section", "Rows": [ { "RowType": "Row", "Cells": [ { "Value": "NET PROFIT" }, { "Value": "-6250.09" }, { "Value": "-7250.09" } ] } ] } ] } ] } |
Now lets look at steps to configure JSON Source to extract your Xero Report Data.
- Drag new JSON Source from SSIS Toolbox
- Double click JSON Source to configure it
- In the Path / Web URL, enter API Report URL to call desired Report Start / End Date or any other expected Parameter by report (Refer to API Documentation). For our example we will enter below URL
1https://api.xero.com/api.xro/2.0/Reports/ProfitAndLoss?fromDate=2017-02-01&toDate=2017-02-28 - Check Use Credentials and Select Connection we created in the Previous Section
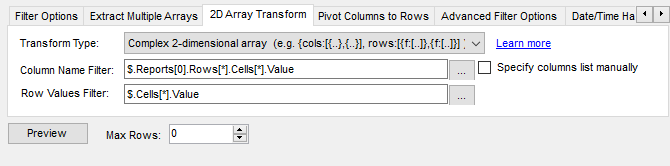
- In the Filter enter $.Reports[*].Rows[*].Rows[*]
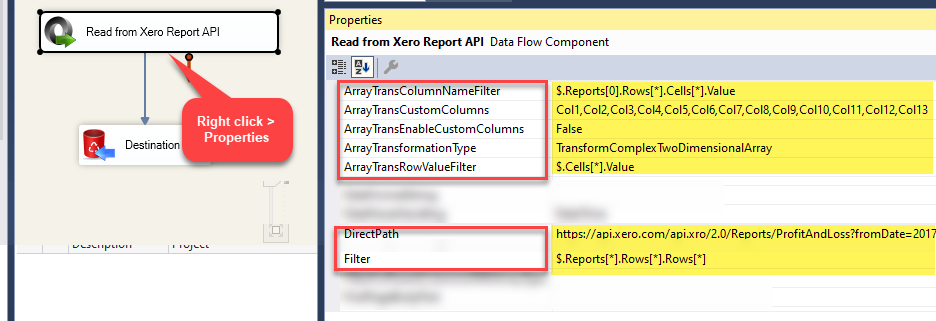
- Now go to 2D Array Transform Tab and configure like below. If your UI varies then use Properties window to edit property manually.
Basically you need to edit
Transformation Type: 2-dimensional array Column Name Filter: $.Reports[0].Rows[*].Cells[*].Value Row Values Filter: $.Cells[*].Value - Now Click Preview Data. If you get error Column ” does not belong to table nosqldata. Then most likely you using old version with Known Issue (i.e. v2.9.7.10822 or older). Get latest version for fix. For workaround of this issue you must follow next section to specify columns manually. Columns must match count.
Here is how it will look like.
Configure Transform Options for Xero Report API (Dynamic Column Title)
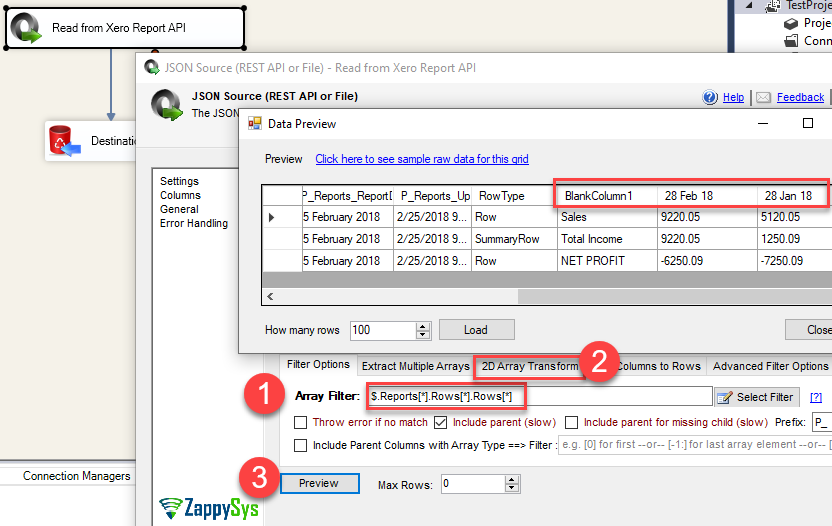
Read from Xero Report API using JSON Source in SSIS (Dynamic Columns Example)
Fixing Dynamic Columns Problem in for Xero Report API
Now let’s look at one common scenario which you have to think. SSIS data flow has fixed metadata so if your Report is generating Dynamic Columns each time based on Date Range then it will be trouble for you because all your columns may come as null if initial date range changes.
To address this issue you have to use Static Column Names as below.
|
1 |
Account (or sometimes blank) | Oct 08 | Sep 08 | Aug 08 | Jul 08 | YTD |
NOTE: Use REST API Task to obtain Raw JSON and review First Row which contains Number of columns
For example if your API return some thing like below then you can use 5 columns (one Blank header + 4 Months)
|
1 2 3 4 5 6 7 8 9 10 11 |
"Rows": [ { "RowType": "Header", "Cells": [ { "Value": "" }, { "Value": "28 Feb 18" } { "Value": "28 Mar 18" } { "Value": "28 Apr 18" } { "Value": "28 May 18" } ] }, |
Once we know how many columns we should expect from API response, we can perform following steps. We will now configure our JSON Source component to use Static Columns.
- Drag new JSON Source from SSIS Toolbox
- Right click JSON Source > Click on Properties (You can do below using UI too but in old version no option for that – See below this section)
- Enter following values for property
- Filter: $.Reports[*].Rows[*].Rows[*]
- ArrayTransformationType: TransformComplexTwoDimensionalArray
- ArrayTransCustomColumns: Col1,Col2,Col3,Col4,Col5,Col6,Col7,Col8,Col9,Col10,Col11,Col12,Col13 (Assuming you have 12 months to compare)
- ArrayEnableCustomColumn: True
- ArrayTransRowValueFilter: $.Cells[*].Value
- Now double click JSON Source to configure
- In the Path / Web URL, enter API Report URL to call desired Report Start / End Date or any other expected Parameter by report (Refer to API Documentation). For our example we will enter below URL
1https://api.xero.com/api.xro/2.0/Reports/ProfitAndLoss?fromDate=2017-02-01&toDate=2017-02-28 - Check Use Credentials and Select Connection we created in the Previous Section
- In the Filter enter $.Reports[*].Rows[*].Rows[*]
- Now click Preview.
For Old Version use Properties Grid
Configure Xero Report Data Extract using SSIS Property Grid (For Older Version)
For New Version Use UI (It has Specify Columns Manually Option)
Read from Xero Report API using parameters in JSON Source in SSIS (Static Columns Example)
Common Errors
The most common error you may face when you run an SSIS package is truncation error. During the design time only 300 rows are scanned from a source (a file or a REST API call response) to detect datatypes but at runtime, it is likely you will retrieve far more records. So it is possible that you will get longer strings than initially expected. For detailed instructions on how to fix common metadata related errors read an article "How to handle SSIS errors (truncation, metadata issues)".
Another frequent error you may get is an authentication error, which happens when you deploy/copy a package to another machine and run it there. Check the paragraph below to see why it happens and how to solve this problem.
Deployment to Production
In SSIS package sensitive data such as tokens and passwords are by default encrypted by SSIS with your Windows account which you use to create a package. So SSIS will fail to decrypt tokens/passwords when you run it from another machine using another Windows account. To circumvent this when you are creating an SSIS package which uses authentication components (e.g. an OAuth Connection Manager or an HTTP Connection Manager with credentials, etc.), consider using parameters/variables to pass tokens/passwords. In this way, you won’t face authentication related errors when a package is deployed to a production server.
Check our article on how to configure packages with sensitive data on your production or development server.
Conclusion. What’s next?
In this article we have learned how to load data from Xero to SQL Server using SSIS ( drag and drop approach without coding). We used SSIS JSON / REST API Connector to extract data from Xero REST API using OAuth. JSON Source Connector makes it super simple to parsing complex / large JSON Files or any Web API Response into rows and column so you can load into database like SQL Server. Download SSIS PowerPack to try many other automation scenarios not discussed in this article.
Keywords:
Xero Integration with SQL Server | How to extract data from Xero in SSIS? | How to read data from Xero API? | Loading Xero Data into SQL Server. | Xero to SQL Server | SQL Server to Xero | SSIS Xero Integration