Introduction
![]() In our previous article, we talked about how to read from Dynamics CRM using easy to use SSIS Dynamics CRM Source connector. In this post, you will learn how to use SSIS JSON Source (for REST API) instead of CRM Source. Using SSIS JSON Source you can read virtually any REST API or JSON file data including Dynamics CRM / Dataverse. For this article, our goal is to learn How to read Microsoft Dynamics 365 data using Web API (OData API) in SSIS. We will use drag and drop approach without any coding.
In our previous article, we talked about how to read from Dynamics CRM using easy to use SSIS Dynamics CRM Source connector. In this post, you will learn how to use SSIS JSON Source (for REST API) instead of CRM Source. Using SSIS JSON Source you can read virtually any REST API or JSON file data including Dynamics CRM / Dataverse. For this article, our goal is to learn How to read Microsoft Dynamics 365 data using Web API (OData API) in SSIS. We will use drag and drop approach without any coding.
Why use Web API (OAuth) for Dynamics 365 CRM?
Microsoft has announced depreciation of older CRM API (SOAP API with WS-Trust Authentication) which means they are no longer going to support the older style of authentication so no option but to switch to newer authentication / API.
In the older approach (SOAP API with WS-Trust Authentication) you must pass your User Name and Password to authenticate, also if MFA / 2FA (Multi-Factored Auth) is turned on by organization policy you cannot use your user id / password in API call. In new authentication (i.e. OAuth) you have to use Client Id and Client Secret only.
Now let’s look at the step by step approach to call Dynamics 365 REST API.
Step-1 : Register Dynamics CRM / Dataverse App obtain App Id / Client Secret
The very first step to access Microsoft Dynamics CRM 365 API is to obtain Application Id (also referred as Client Id) and Client Secret. We will use this information later in this article (on OAuth connection UI).
- Register Dynamics CRM / Dataverse App With Azure and get the credential (App Id, Client Secret).
Step-2 : Read Microsoft Dynamics 365 API data in SSIS using JSON Source
Let’s start with an example. We use SSIS JSON Source Task to make calls to Microsoft Dynamics 365 API, we will load Dynamics 365 Leads data to SQL Server.
Please refer to this link for more information: Microsoft Dynamics 365 Web API Reference
Find out API Url for your environment (organization url)
Once we are done with the creation of the Azure AD app to obtain App Id /Secret out next step is to find out the base API URL for your organization / environment.
If you have multiple environments (i.e. Prod, Sandbox) then each environment might have its own unique URL)
- To find your API Service URL, Click on Gear Icon
- Choose Advanced Settings
- Click down arrow on Settings
- Click Customization
- Click Developer Resource Link
- On this page now you can see various URLs. For examples used in this article, we need to get is Service Root URL for Web API
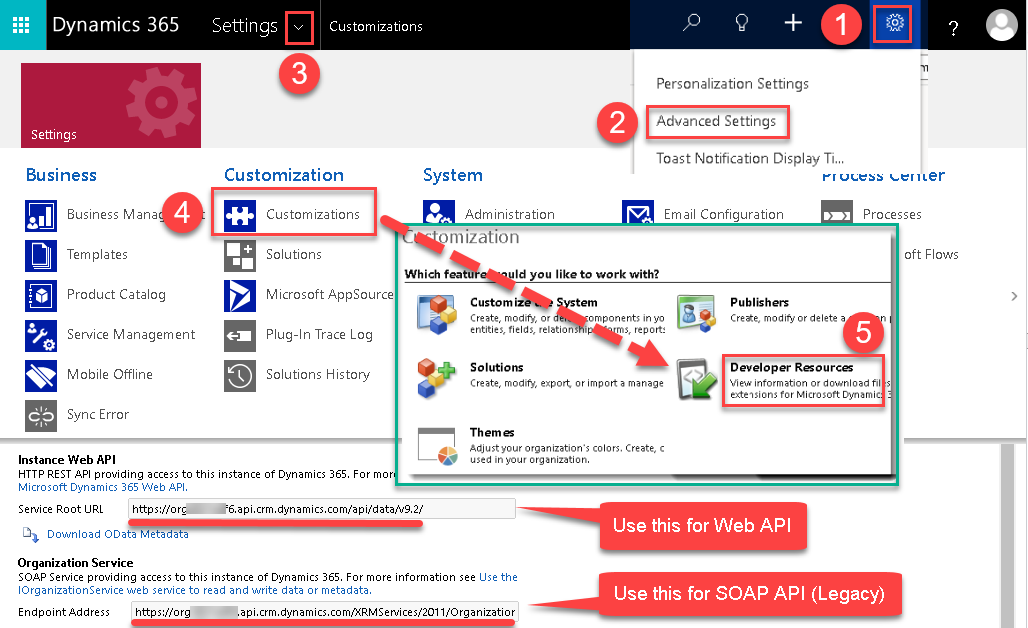
How to Find Organization Id / Web API URL / SOAP API Service URL (Unique Environment Instance URL)
Create SSIS Data Flow to read data from Dynamics CRM / Dataverse
-
First of All, Drag and drop Data Flow Task from SSIS Toolbox and double click it to edit.

Drag and Drop SSIS Data Flow Task from SSIS Toolbox
-
Furthermore, Drag and Drop JSON Source(REST API and File) File Task from the SSIS Toolbox.
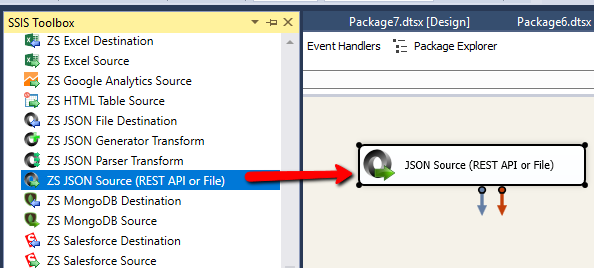
Drag and Drop JSON Source Component
Create OAuth Connection for Dynamics CRM / Dataverse
Now lets look at how to create and configure OAuth connection to call Web API for Dynamics CRM / Dataverse
-
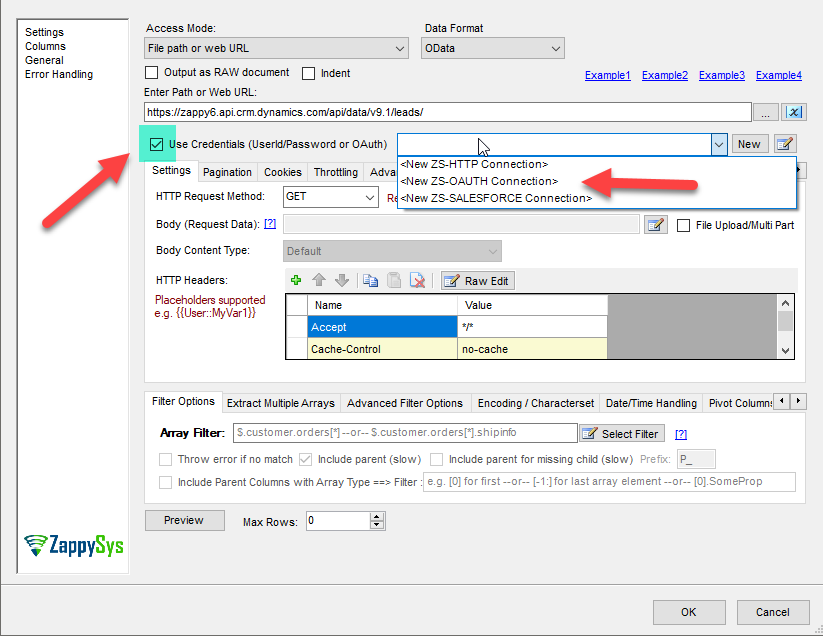
Check Use Credentials Option and select a new ZS-OAuth Connection from the drop-down.

Check Use Credentials
-
Once OAuth Connection UI opens up. Configure like below on General Tab.
Change OAuth Version to OAuth2
Change Grant Type to Client Credentials
Enter Client Id (Azure AD App Id) (Obtained in the Previous Section)
Enter Client Secret (Obtained in the Previous Section)
Enter Token URL (see below)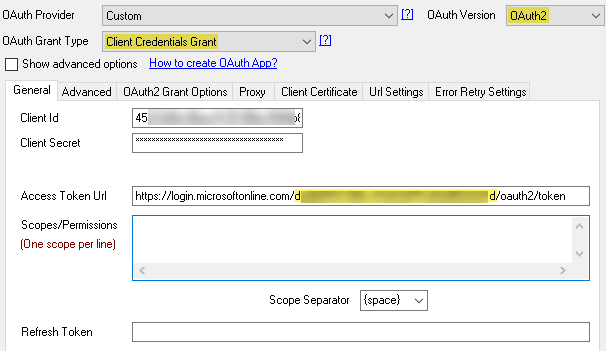
Configure OAuth Connection for Azure AD App – Client Credentials Grant (Tenant Specific Token EndPoints)
For Client Credentials Grant
Enter Token URL as https://login.microsoftonline.com/<your-tenant-id>/oauth2/token
(You can find Tenant ID on the Overview page of your Azure AD App)For Default Grant (3-legged – requires User Login Prompt)
Enter Auth URL as https://login.microsoftonline.com/common/oauth2/authorize
Enter Token URL as https://login.microsoftonline.com/common/oauth2/token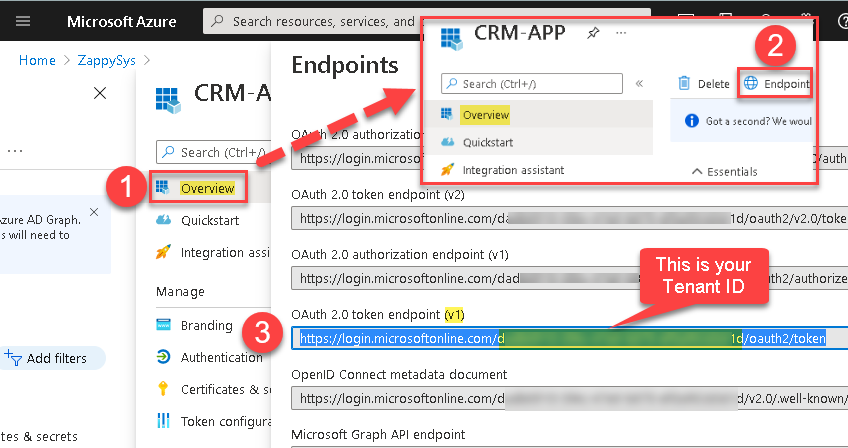
Where to find Token Endpoint with Tenant ID in the URL (Azure AD App)
-
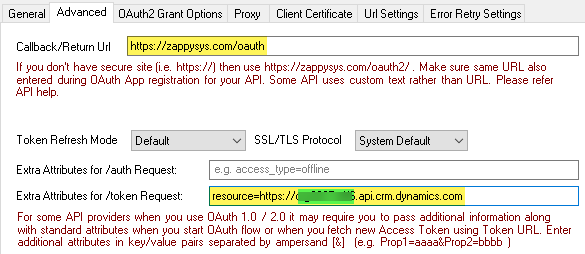
Now go to Advanced Tab and configure like belowEnter Extra Attribute for /auth as
resource=https://<your-instance-id>.api.<your-crm-region>.dynamics.com
Client Credentials Grant for Dynamics CRM / Dataverse – API Access (Azure AD App / OAuth)
- Click OK to Save connection.
Get all Accounts, Contacts, and Leads using Dynamics 365 API
Now let’s configure API URL from where you like to read data.
For example, if you just use the root URL then it will list all possible entries
Root URL: https://{{organization-uri}}/api/data/v9.1/
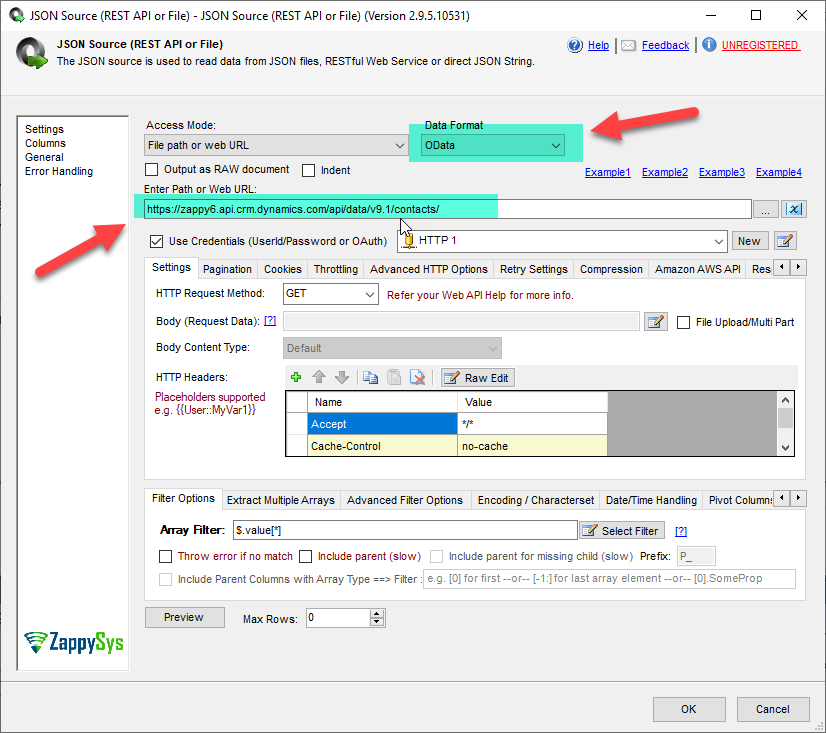
- Double click on the Component to Edit the Configurations.
- Change Data Format to OData.
-
In the Web URL Field, you can enter any valid URL for Web API. Please refer to this link of Dynamics 365 Rest API for more information.Example Data URLs
1234https://{{organization-uri}}/api/data/v9.1/https://{{organization-uri}}/api/data/v9.1/accountshttps://{{organization-uri}}/api/data/v9.1/contactshttps://{{organization-uri}}/api/data/v9.1/leads
Here, replace {{organization-uri}} in URL to your Microsoft Dynamics 365 site domain name (Example zappy6.api.crm.dynamics.com Dynamics 365 URL).

Set URL in JSON Source
Preview / Query Dynamics 365 Data
- Now select Array filter as $.value[*] (Click Select Filter Button – Choose value node)
-
Click on the Preview button to get the data.
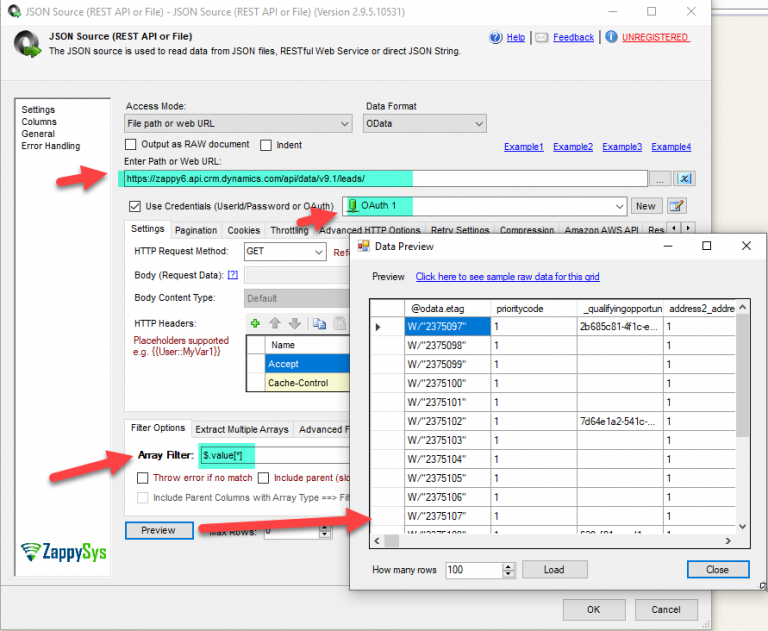
Preview Data
- Finally, click OK to save JSON Source settings.
- That’s it we are ready to load Dynamics 365 API data to SQL Server.

Load Microsoft Dynamics 365 API data into SQL Server
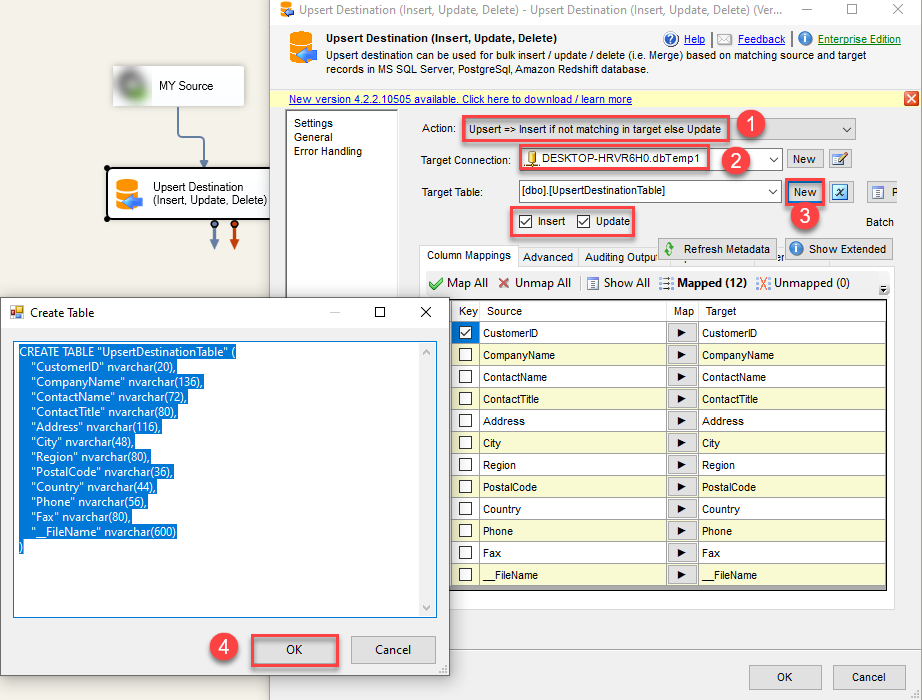
- Inside Data Flow, Drag and drop Upsert Destination Component from SSIS Toolbox
- Connect our Source component to Upsert Destination
- Double click Upsert Destination to configure it
- Select Target Connection or click NEW to create new connection
 Configure SSIS Upsert Destination Connection - Loading data (REST / SOAP / JSON / XML /CSV) into SQL Server or other target using SSIS
 - Select Target Table or click NEW to create new table based on source columns
- Click on Mappings Tab to Auto map columns by name. You can change mappings as you need
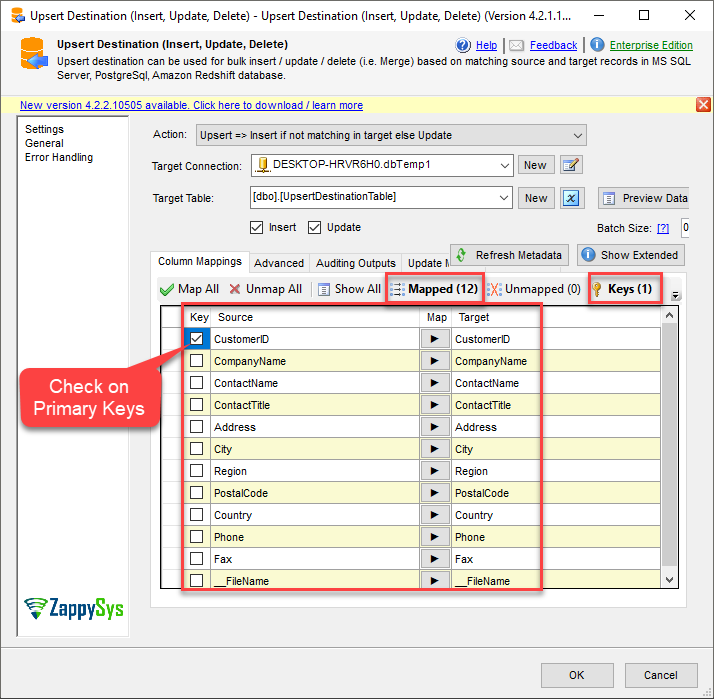 SSIS Upsert Destination - Columns Mappings
 - Click OK to Save Upsert Destination Settings
- That's it, You are now ready to run data flow. NOTE: If you wish to debug data flow and see records when you run, add data viewer by right click on blue arrow > Click Enable Data Viewer
- To execute data flow, Right click anywhere inside Data Flow Surface and click Execute Task
Conclusion
In this post you have seen how to Read Microsoft Dynamics 365 API data in SSIS. We used JSON Source Component to call Dynamics 365 REST API and load data into SQL server. You can download SSIS PowerPack here to try many other scenarios not discussed in this blog along with 70+ other components.
References
Finally, you can use the following links for more information about the use of Dynamics 365 REST API with our tools:
- JSON Source, you can also find Tutorial Video here.
- Help File: Documentation of SSIS Json Source
- Microsoft Dynamics CRM Web API Reference
- Dynamics 365 Web API EntityType Reference