Introduction
Please visit this page to see all preconfigured ready-to-use API connectors that you can use in SSIS API Source / SSIS API Destination OR API ODBC Driver (for non-SSIS Apps such as Excel, Power BI, and Informatica).
In our previous article, we see how to load data into Elastic Search using SSIS. Now let’s look at how to read data from ElasticSearch using SSIS and load response into SQL Server.
Elasticsearch is a powerful engine that allows you to store, aggregate, and, most importantly, search data in a very analytical way. In this tutorial, you will learn how to load Elasticsearch data to SQL Server with SSIS (part of SQL Server) and ZappySys PowerPack. We also see how to set the maximum result window of the index using the Rest API Task.
In a nutshell, this post will focus on how to Make Elasticsearch Search API call using SSIS.
Prerequisites
Before we perform the steps listed in this article, you will need to make sure the following prerequisites are met:- SSIS designer installed. Sometimes it is referred to as BIDS or SSDT (download it from the Microsoft site).
- Basic knowledge of SSIS package development using Microsoft SQL Server Integration Services.
- Make sure ZappySys SSIS PowerPack is installed (download it, if you haven't already).
- (Optional step). Read this article, if you are planning to deploy packages to a server and schedule their execution later.
Step-By-Step to Call Elasticsearch API call using SSIS
Read from Elasticsearch Search API call
Let’s make the Elasticsearch Search API call using the JSON source to get all the records of the index with pagination.
- First of All, Drag and drop Data Flow Task from SSIS Toolbox and double click it to edit.
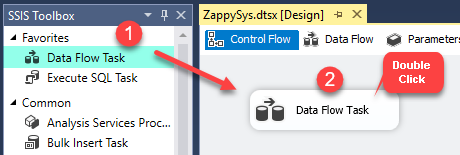
Dragging and dropping Data Flow Task into Control Flow
- From the SSIS toolbox drag and drop JSON Source on the data flow designer surface.
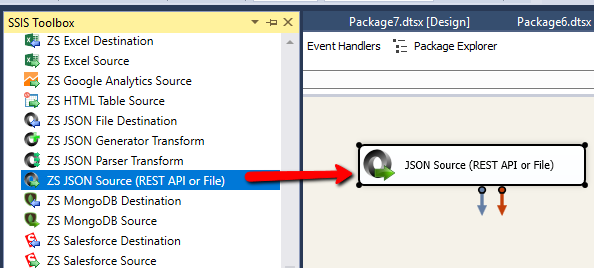
Drag and Drop JSON Source Component
- Double click JSON Source and enter the following URL as below to make Search API Call on the index.
1http://{elasticsearch-site-url}/{index}/{index-type}/_search - Now check Use credentials and Select Connection section press
<New ZS-HTTP Connection>.
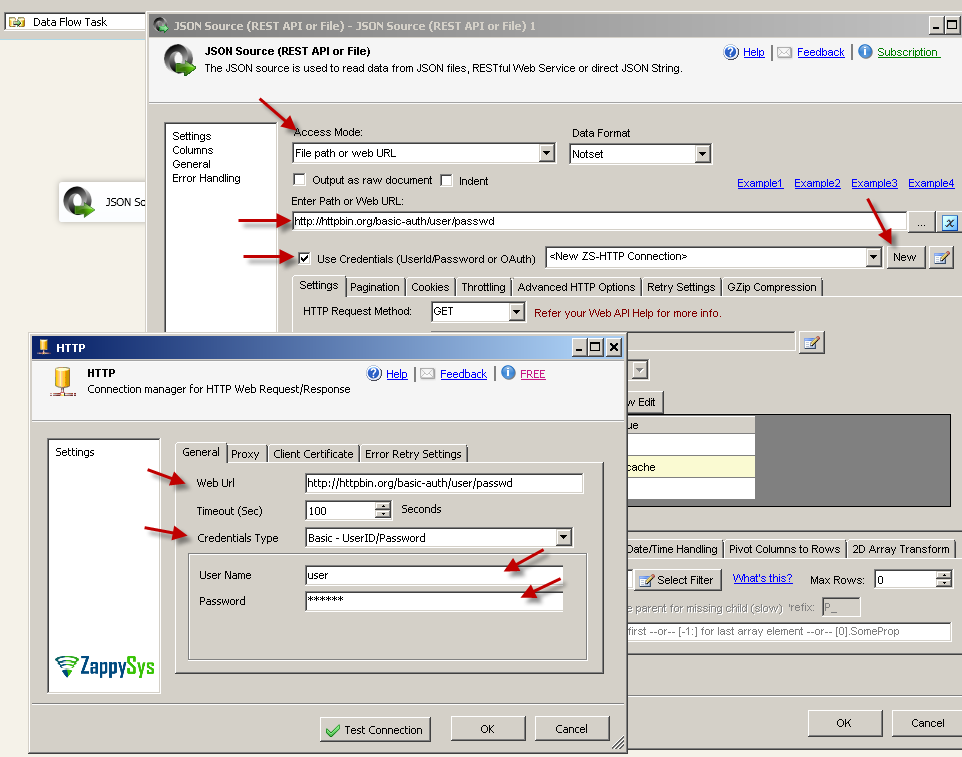
SSIS JSON Source – Passing Basic Credentials (Supply UserID / Password) using HTTP Connection
- Once the HTTP Connection Manager window opens configure the connection to your Elasticsearch instance:
- Set Web Url, which points to your Elasticsearch instance.
- Set Credentials Type to Basic - UserID/Password (or other appropriate authentication methods).
- Finally, set User Name and Password:
Configure SSIS HTTP Connection to connect to Elasticsearch
- Now, select method as POST and set for and size value in the body to get data using pagination. Set the content type as JSON (application/json).
1{"from" : <%page%>, "size" : 100} - Furthermore, go to the pagination tab and configure pagination like the below screenshot makes sure we need to enter increment size the same as given in body size value therefor 100.
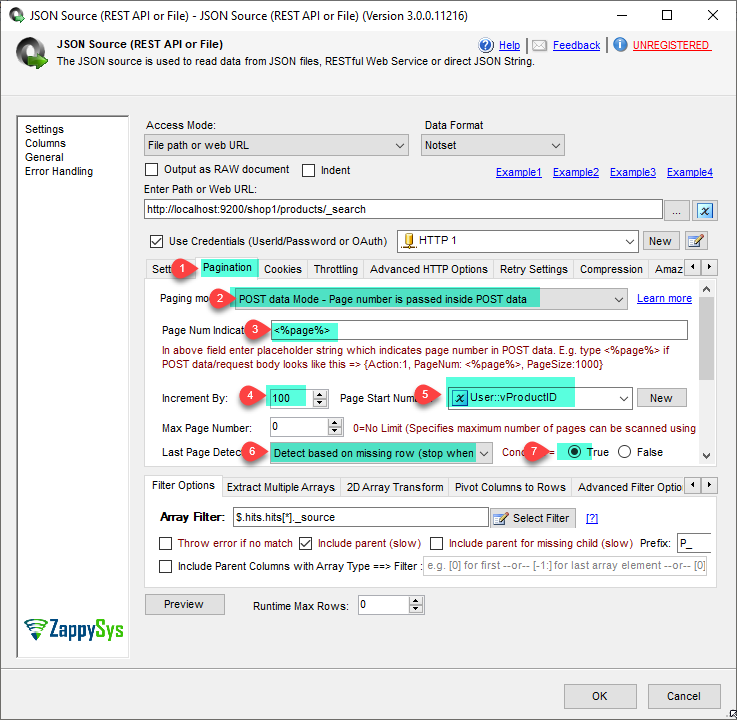
Pagination Mode: POST data in the body
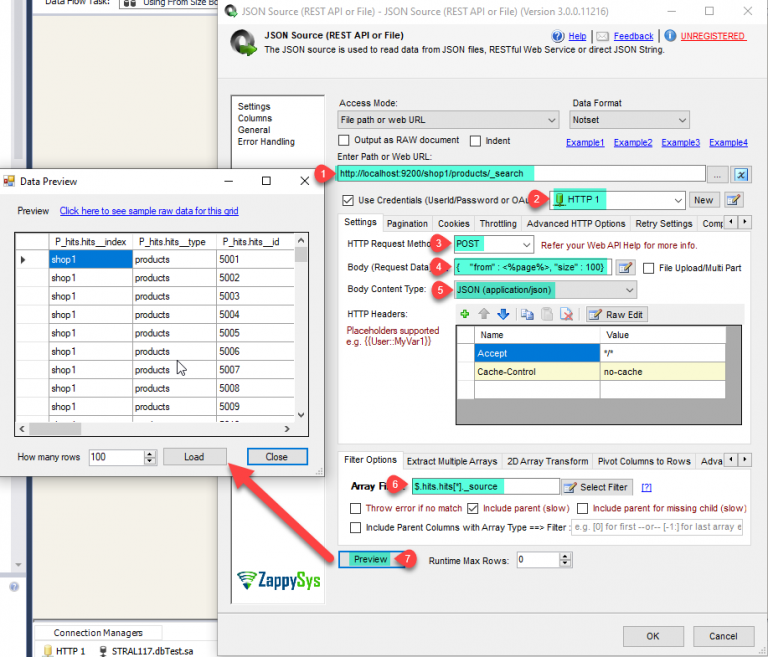
- That’s it now select the desired filter and click on the Preview button.
- That’s it we are ready to load the data in the SQL Server.


For more than 10000 rows
When you try to get more than 100000 rows you will get the next error message
|
1 2 3 4 5 6 7 8 9 10 11 |
{ "error": { "root_cause": [ { "type": "illegal_argument_exception", "reason": "Result window is too large, from + size must be less than or equal to: [10000] but was [11000]. See the scroll api for a more efficient way to request large data sets. This limit can be set by changing the [index.max_result_window] index level setting." } ] }, "status": 400 } |
Here is how to configure your JSON Source to pull more than 10K rows using Scroll Method.
- In Settings Tab: In the Body and URL rather than Index name use [$tag$]
- In the filter type: $.hits.hits[*]._source
- Uncheck Include Parent
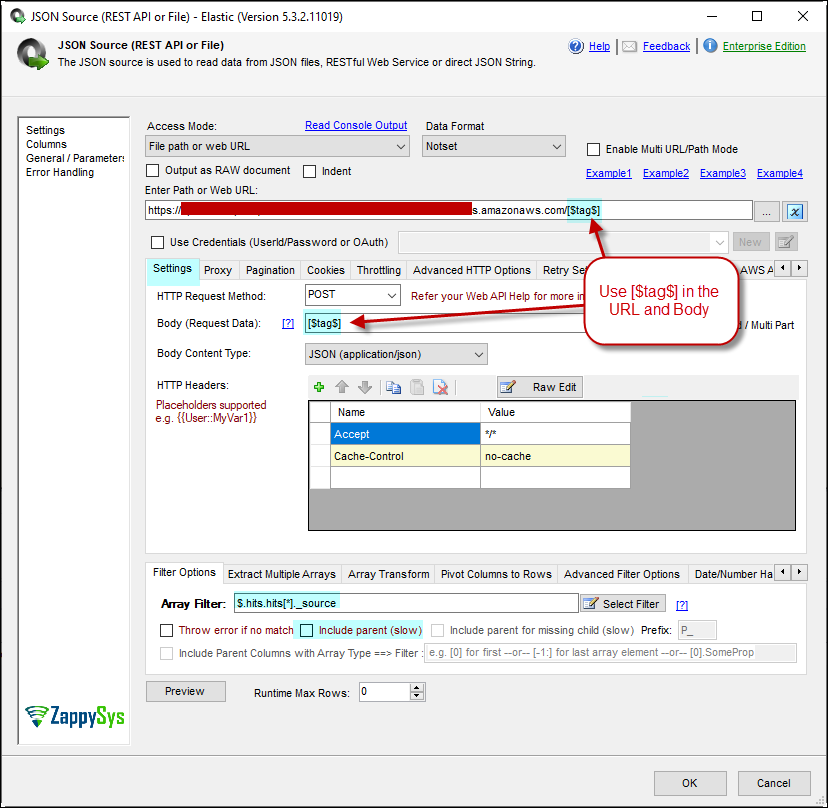
Elasticsearch example for more than 10000 rows
- In Pagination Tab, Set Next Link as below $._scroll_id
- Stop Indicator Attribute as below $.hits.hits[0]._id
- Stop Indicator Value as
regex=^$
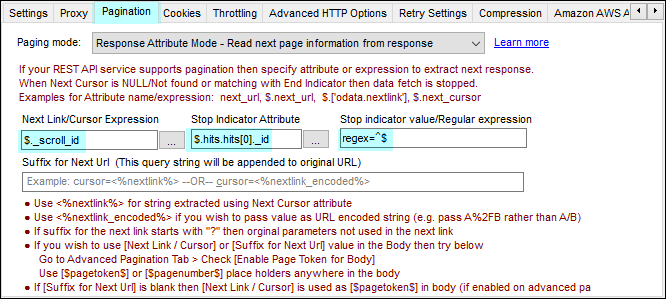
Elasticsearch pagination tab configuration
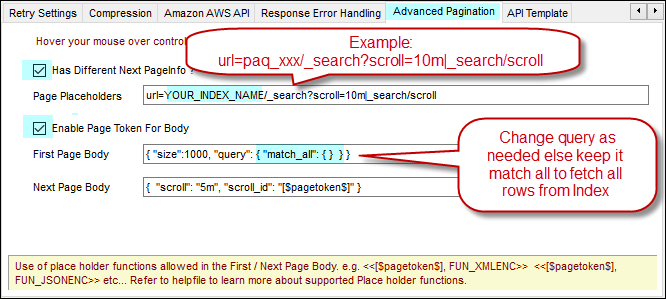
- In Advanced Pagination Tab, Check Has Different Page Info and Enable Page Token
- Enter Page Place Holders as below (change YOUR_INDEX_NAME)
url=YOUR_INDEX_NAME/_search?scroll=10m|_search/scroll - First Page Body as below – Change query as needed else keep it match all to fetch all rows from Index
{ "size":1000, "query": { "match_all": { } } } - Next Page Body as below
{ "scroll": "5m", "scroll_id": "[$pagetoken$]" }
Configuration for Elasticsearch advanced pagination tab
Loading Elasticsearch API data into SQL Server / Other Target
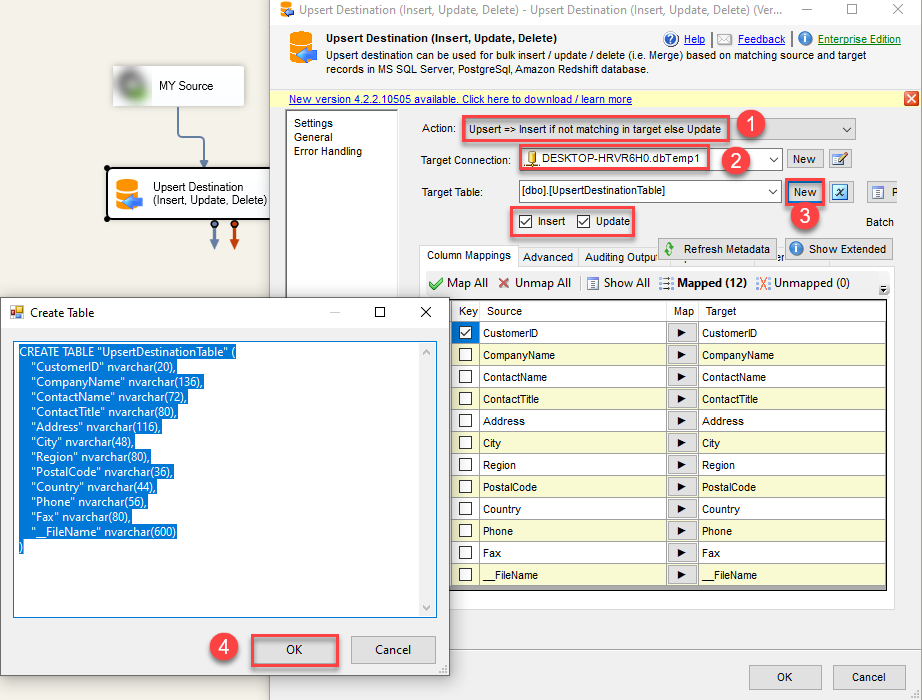
- Inside Data Flow, Drag and drop Upsert Destination Component from SSIS Toolbox
- Connect our Source component to Upsert Destination
- Double click Upsert Destination to configure it
- Select Target Connection or click NEW to create new connection
 Configure SSIS Upsert Destination Connection - Loading data (REST / SOAP / JSON / XML /CSV) into SQL Server or other target using SSIS
 - Select Target Table or click NEW to create new table based on source columns
- Click on Mappings Tab to Auto map columns by name. You can change mappings as you need
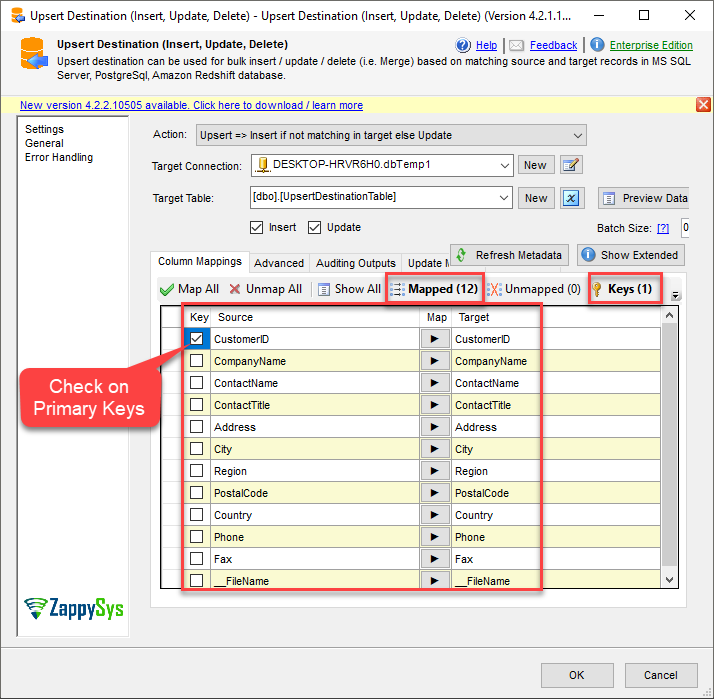 SSIS Upsert Destination - Columns Mappings
 - Click OK to Save Upsert Destination Settings
- That's it, You are now ready to run data flow. NOTE: If you wish to debug data flow and see records when you run, add data viewer by right click on blue arrow > Click Enable Data Viewer
- To execute data flow, Right click anywhere inside Data Flow Surface and click Execute Task
Enable Deep Pagination Setting
By default index, the maximum result window size is 10,000 means you can paginate upto 10000 rows. If you ever want to get more than 10000 result then you have to perform the following steps to change default setting from 10000 to 500000 (that’s max).
We need to send PUT request to below URL:
|
1 |
http://{elasticsearch-site-url}/{your-index}/_settings |
Need to pass below body as I am setting max result window size value as 500000.
|
1 |
{ "index" : { "max_result_window" : 500000 } } |
And set content-type as JSON (application/json) and click on Test Request/Response and it will make the API call and set the max window size.
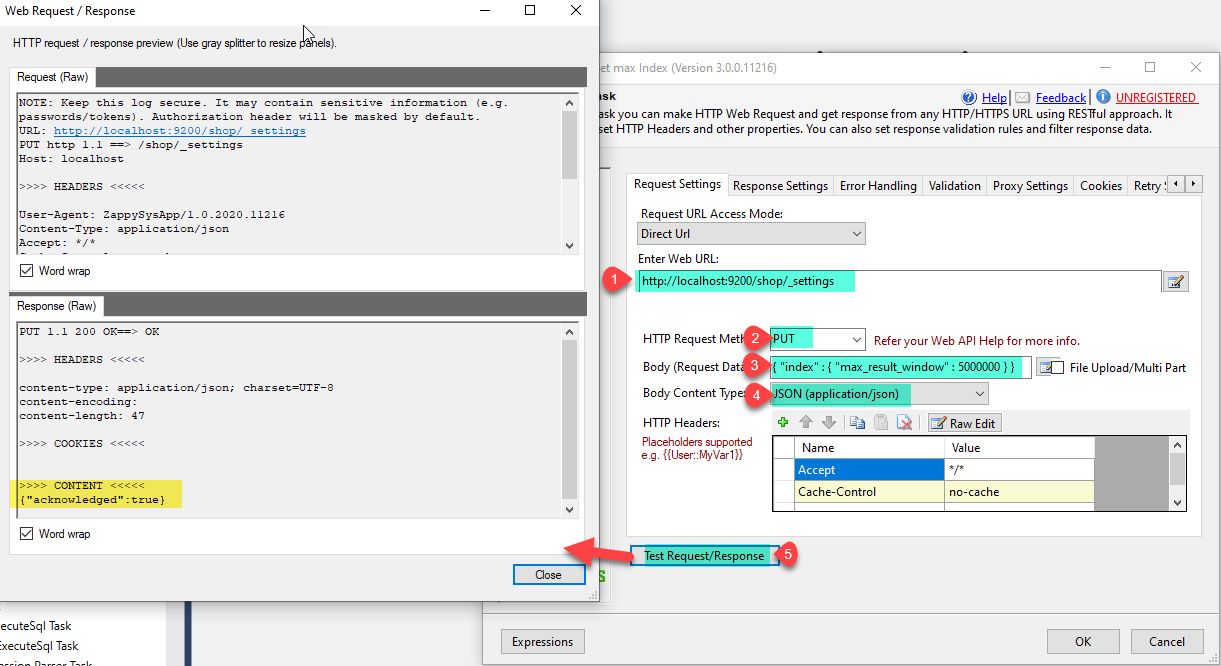
Rest API Task PUT Call
That’s it we have successfully made the call to set the maximum result window size of the index.
Common Errors
The most common error you may face when you run an SSIS package is truncation error. During the design time only 300 rows are scanned from a source (a file or a REST API call response) to detect datatypes but at runtime, it is likely you will retrieve far more records. So it is possible that you will get longer strings than initially expected. For detailed instructions on how to fix common metadata related errors read an article "How to handle SSIS errors (truncation, metadata issues)".
Another frequent error you may get is an authentication error, which happens when you deploy/copy a package to another machine and run it there. Check the paragraph below to see why it happens and how to solve this problem.
Deployment to Production
In SSIS package sensitive data such as tokens and passwords are by default encrypted by SSIS with your Windows account which you use to create a package. So SSIS will fail to decrypt tokens/passwords when you run it from another machine using another Windows account. To circumvent this when you are creating an SSIS package which uses authentication components (e.g. an OAuth Connection Manager or an HTTP Connection Manager with credentials, etc.), consider using parameters/variables to pass tokens/passwords. In this way, you won’t face authentication related errors when a package is deployed to a production server.
Check our article on how to configure packages with sensitive data on your production or development server.
Conclusion
After all, we saw you How to Make Elasticsearch Search API call using SSIS JSON Source and load response into SQL Server. In this article, we have seen that how to make a setting call to set the maximum result window of the index. To explore many other scenarios not discussed in this article download SSIS PowerPack from here (includes 70+ Components).
References
Finally, you can use the following links for more information: