Introduction
![]() In this article, you will learn how to push data into a Power BI dataset from SQL Server. Power BI is a Microsoft reporting product that can get data from virtually any source and display it nicely in a report or a dashboard. Among its dataset types, it has a streaming dataset into which you can push data from a Power BI REST API. Once pushed, data will be immediately refreshed in a visual, pinned to a dashboard. Thus this approach of sending data to a streaming dataset is a perfect way for displaying real-time data. Yet it is not possible to push data to a dataset straight from SQL Server out of the box. However, with ZappySys ODBC PowerPack it is possible to achieve that quite easily. We will employ one of its apps – ZappySys Data Gateway – to make HTTP requests and push data to a streaming dataset.
In this article, you will learn how to push data into a Power BI dataset from SQL Server. Power BI is a Microsoft reporting product that can get data from virtually any source and display it nicely in a report or a dashboard. Among its dataset types, it has a streaming dataset into which you can push data from a Power BI REST API. Once pushed, data will be immediately refreshed in a visual, pinned to a dashboard. Thus this approach of sending data to a streaming dataset is a perfect way for displaying real-time data. Yet it is not possible to push data to a dataset straight from SQL Server out of the box. However, with ZappySys ODBC PowerPack it is possible to achieve that quite easily. We will employ one of its apps – ZappySys Data Gateway – to make HTTP requests and push data to a streaming dataset.
The use cases when you may want to push data to a streaming dataset from a SQL Server are:
- Displaying real-time data from many SQL Server instances at once (and you cannot use the DirectQuery option in a report).
- Displaying real-time data when many sources write to a dataset, and a SQL Server is one of them.
- Any other case.
Let’s begin and write some data to a Power BI streaming dataset!
Prerequisites
- You have a Power BI account and you have basic Power BI skills.
- SQL Server instance installed (can be a SQL Server Express LocalDB instance).
- SQL Server Management Studio (SSMS) installed.
- ZappySys ODBC PowerPack installed (must be installed on a Windows machine; can be a different machine than SQL Server is installed on).
Step By Step – Push data into a Power BI dataset from a SQL Server
Create a streaming dataset in Power BI
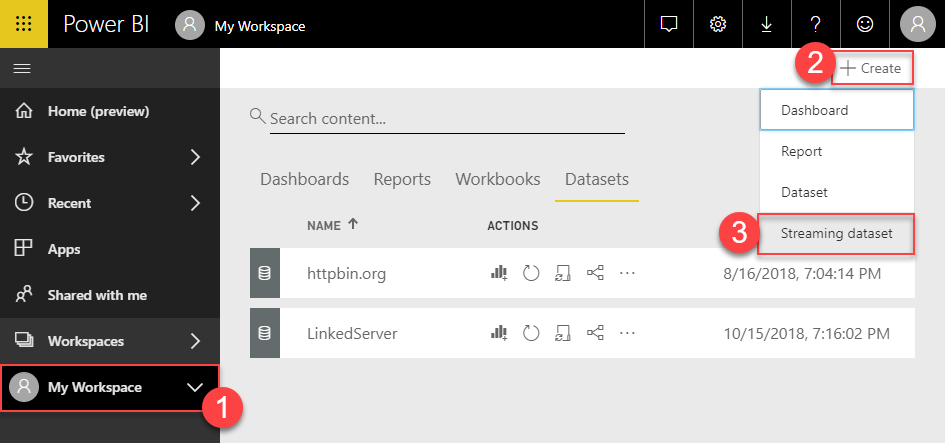
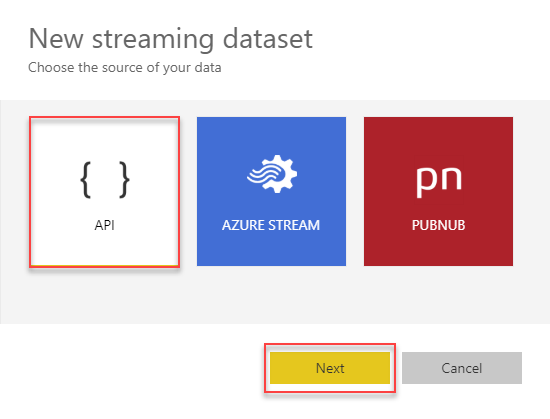
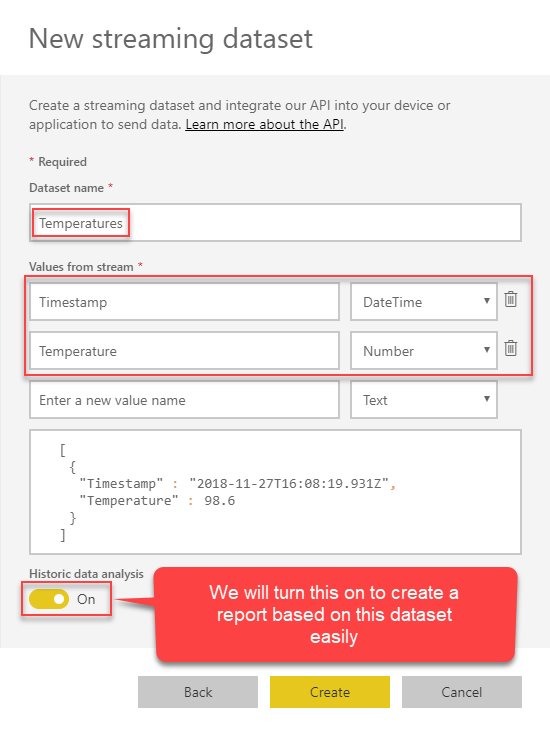
The first thing you need to do is to create a streaming dataset. We will create a simple dataset for demo purposes which will have two columns: Timestamp and Temperature.- Go to Power BI portal, hit My Workspace, + Create and then click Streaming dataset:
- Then select API and click Next:
- Give dataset a name, add two columns and check Historic data analysis to enable data history and the ability to create report easily (otherwise you will be able to create a tile in a dashboard only):
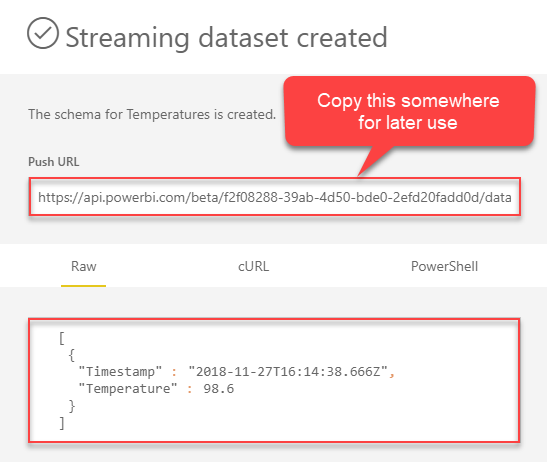
- Once a dataset is created, copy Push URL to a notepad so we can use it later. Also, note the structure of the JSON we will have to use to submit live data into the created dataset:
Configure ZappySys Data Gateway
Now let's look at steps to configure Data Gateway after installation.- Assuming you have installed ZappySys ODBC PowerPack using default options (Which also enables Data Gateway Service)
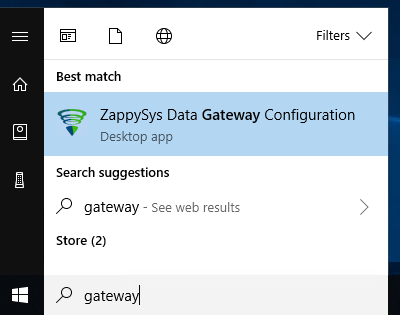
- Search "Gateway" in your start menu and click ZappySys Data Gateway
Opening ZappySys Data Gateway
- First, make sure Gateway Service is running (Verify Start icon is disabled)
- Also, verify Port on General Tab
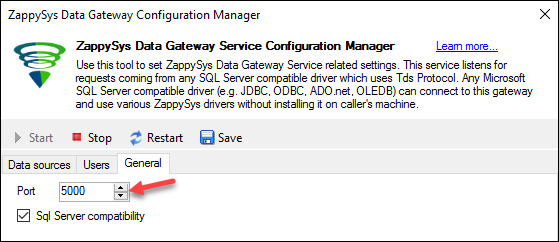
Checking port number setting on ZappySys Data Gateway
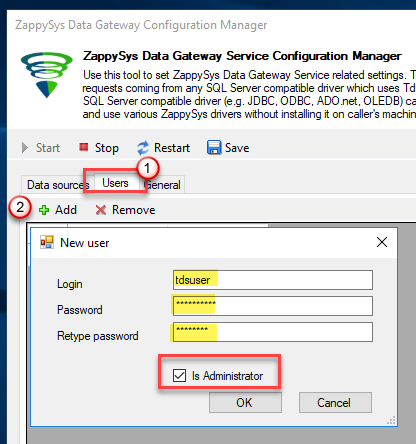
- Now go to Users tab. Click Add icon to add a new user. Check Is admin to give access to all data sources you add in future. If you don't check admin then you have to manually configure user permission for each data source.
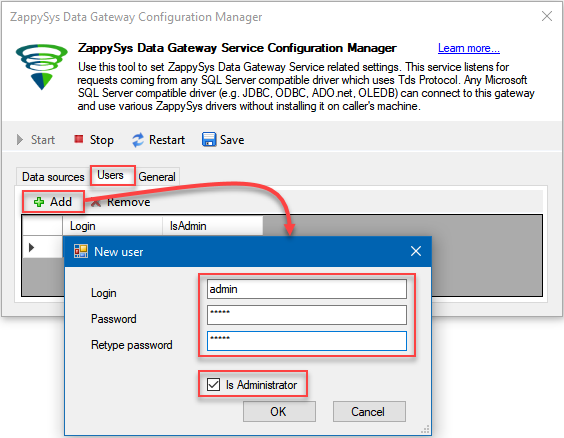
Adding the Gateway user
Add a data source in the Gateway
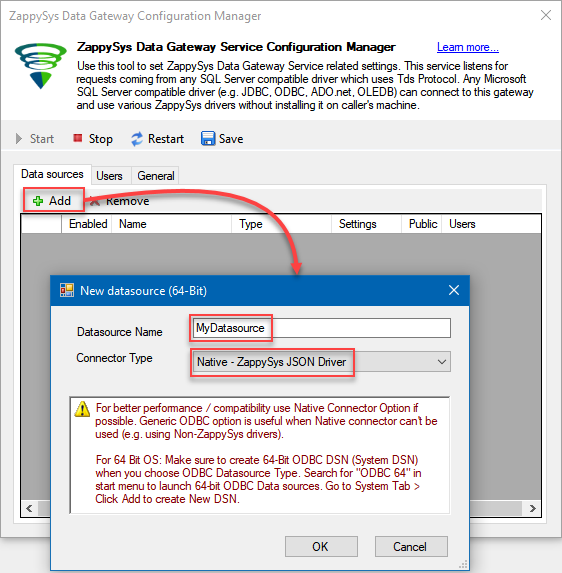
It’s time to add a data source, which we will use to POST data to Power BI REST API:
- In the Gateway, click on Data sources tab, click Add, give data source a name and set Connector Type to Native – ZappySys JSON Driver:
- Then click Edit to modify the data source:

- Finally, paste into Url textbox Push URL of the dataset which we saved in a previous step. Also, set HTTP Request Method to POST:
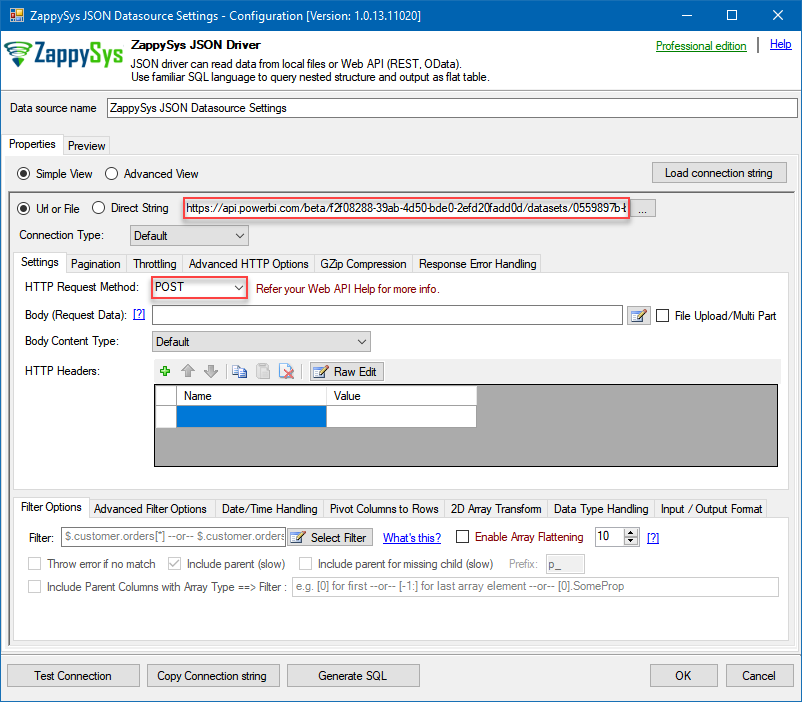
Configure REST API Connection for Power BI dataset insert (Using ZappySys JSON / REST Driver)
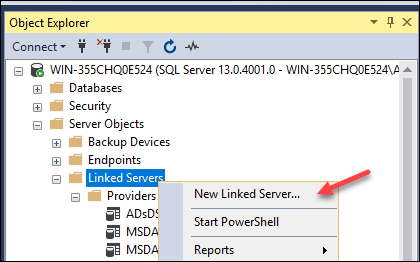
Add a Linked Server to the Gateway
- Open SSMS and connect to a SQL Server.
- Go to Root > Server Objects > Linked Servers node. Right click and click New Linked Server...
Adding Linked Server in SQL Server
- Now enter the linked server name, select Provider as SQL Native Client.
- Enter data source as GatewayServerName,PORT_NUMBER where server name is where ZappySys Gateway is running (can be the same as SQL Server machine or a remote machine). Default PORT_NUMBER is 5000 but confirm that on the Gateway > General tab in case it's different.
- Enter Catalog Name. This must match the name from the Gateway Data sources grid > Name column:
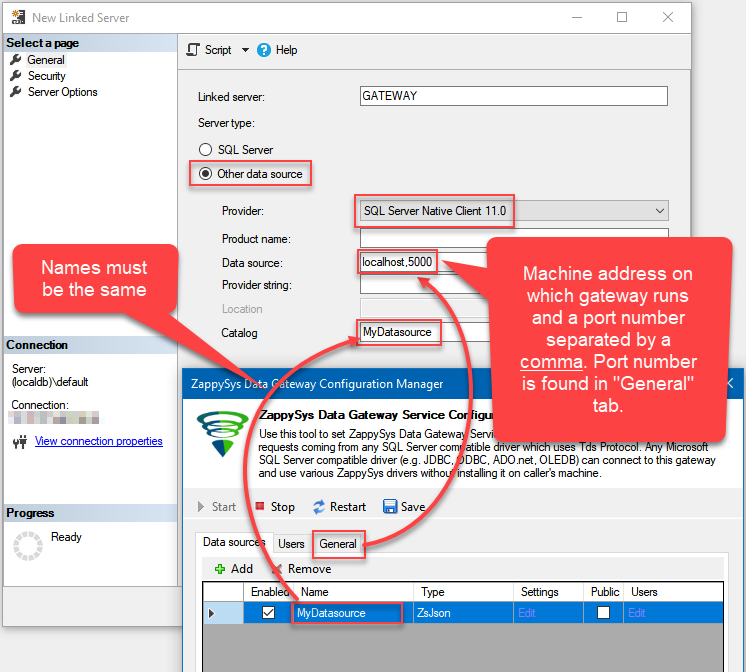
Configuring Linked Server Provider, Catalog, Server, Port for ZappySys Data Gateway Connection
- Click on Security Tab and select the last option "Be made using this security context". Enter your gateway user account here.
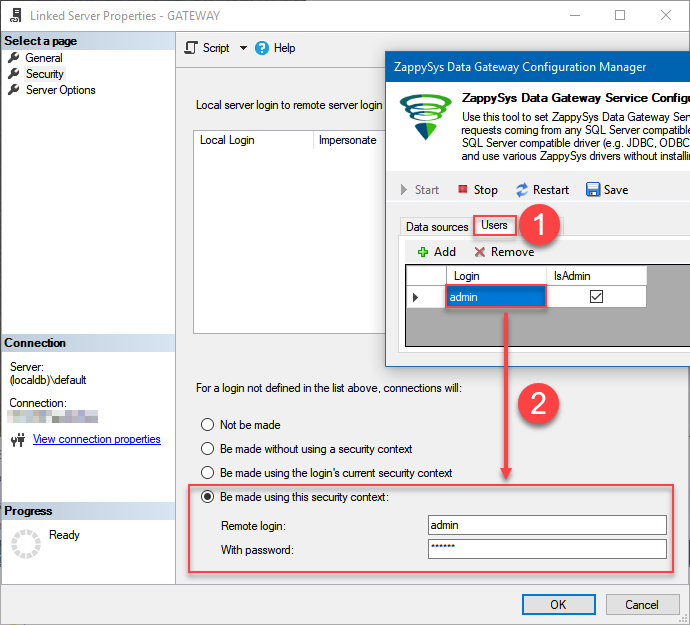
Configuring Linked Server credentials
Optional: Under the Server Options Tab, Enable RPC and RPC Out and Disable Promotion of Distributed Transactions(MSDTC).

RPC and MSDTC Settings
You need to enable RPC Out if you plan to use EXEC(...) AT [MY_LINKED_SERVER_NAME] rather than OPENQUERY.
If don't enabled it, you will encounter the 'Server "MY_LINKED_SERVER_NAME" is not configured for RPC' error.Query Example:
EXEC('Select * from Products') AT [MY_LINKED_SERVER_NAME]
If you plan to use 'INSERT INTO...EXEC(....) AT [MY_LINKED_SERVER_NAME]' in that case you need to Disable Promotion of Distributed Transactions(MSDTC).
If don't disabled it, you will encounter the 'The operation could not be performed because OLE DB provider "SQLNCLI11" for linked server "MY_LINKED_SERVER_NAME" was unable to begin a distributed transaction.' error.Query Example:
Insert Into dbo.Products
EXEC('Select * from Products') AT [MY_LINKED_SERVER_NAME]
- Click OK to save the Linked Server.
Writing data into Power BI dataset from SQL Server
Once you add a Linked Server you can execute a query to push data into a Power BI streaming dataset:
- In the same SQL Server Management Studio create a new query and paste the code below. In Body attribute, we pass the JSON in the same format which was shown when we created a Power BI dataset:
12345678910SELECT * FROMOPENQUERY([GATEWAY], 'SELECT * FROM $WITH (Body=''[{ "Timestamp" :"2018-11-15T02:57:04.547Z", "Temperature" : 50.5 },{ "Timestamp" :"2018-11-16T02:57:04.547Z", "Temperature" : 55.5 },{ "Timestamp" :"2018-11-17T02:57:04.547Z", "Temperature" : 60.5 },{ "Timestamp" :"2018-11-18T02:57:04.547Z", "Temperature" : 57.5 },{ "Timestamp" :"2018-11-19T02:57:04.547Z", "Temperature" : 62.3 }]'',meta=''[ { "Name": "Dummy", "Type": "String" }]'' )')Note: Use the same Linked Server name you created in a previous step. In our case, it is “GATEWAY”. - Execute the query.
The results: creating a Power BI report
Now it’s time to check the results and see if data went through:
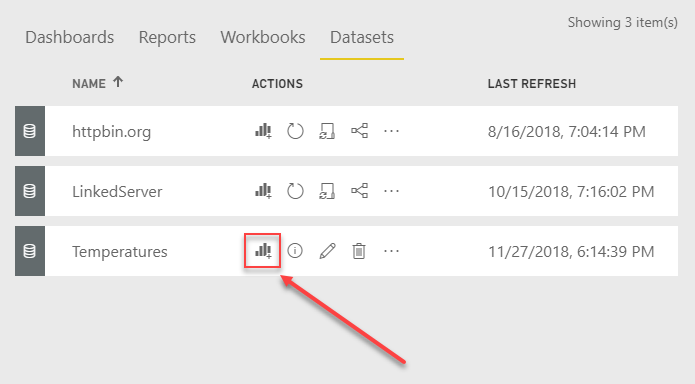
- Go to Power BI portal.
- Select Datasets and click on the add new report icon:
Create new Power BI Report for real time dataset
- Add a Line Chart, a Table and link them to the dataset.
- You should see the data we pushed to the dataset:
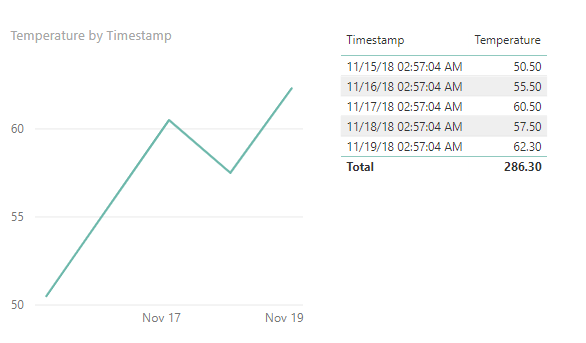
Showing real time data in Power BI dashboard
Note: To see real-time data, pin a visual to a dashboard. Live data can be seen only in a dashboard since only there data is refreshed when a new piece of data is received. However, it does not work with reports – if you pin a whole report to a dashboard it won’t update data in real-time.Conclusion
You learned how to push data into a Power BI streaming dataset directly from SQL Server. It was possible to achieve that with ZappySys Data Gateway and SQL Server Linked Server option. At first, we created a streaming dataset in Power BI, then configured a datasource in the Gateway, followed with adding a Linked Server to the Gateway, executed T-SQL query in SSMS and pushed some data to the dataset and finally created a Power BI report to check the received data.
When we set Historic data analysis option when creating a dataset, we, in turn, created a dataset of type Push (if we left it off, it would be of type Streaming). It allowed us to create a report easily on top of it, but it has certain limitations. Just be aware when using this option and check Power BI service documentation for more info.
Finally, in SSMS, we executed a query with predefined data. Therefore in real life, if you want to push data from an existing table, you will have to build JSON from it. Make sure you construct a valid JSON and escape the symbols that need to be escaped (such as a double-quote or a backslash).
References
https://powerbi.microsoft.com/en-us/
https://docs.microsoft.com/en-us/rest/api/power-bi/
https://docs.microsoft.com/en-us/power-bi/service-real-time-streaming
https://docs.microsoft.com/en-us/power-bi/developer/api-rest-api-limitations