Introduction
Please visit this page to see all preconfigured ready-to-use API connectors that you can use in SSIS API Source / SSIS API Destination OR API ODBC Driver (for non-SSIS Apps such as Excel, Power BI, and Informatica).
Elasticsearch is a powerful engine that allows you to store, aggregate, and, most importantly, search data in a very analytical way. In this tutorial, you will learn how to bulk load data from SQL Server to Elasticsearch with SSIS (part of SQL Server) and ZappySys PowerPack.
The scope of this article will be to show how to import records from SQL Server into Elasticsearch index as JSON documents using Elasticsearch Bulk API. In a nutshell, we will retrieve IDs and names of the products from a SQL table, transform each row into a JSON and lastly, index each JSON in Elasticsearch under record’s corresponding ID. This tutorial is going to be your stepping stone to use any Elasticsearch API as a destination.
We will be using these SSIS components of PowerPack to make things work:

Let’s begin?
Prerequisites
- SSIS designer installed. Sometimes it is referred as BIDS or SSDT (download it from Microsoft site).
- Basic knowledge of SSIS package development using Microsoft SQL Server Integration Services.
- Northwind database deployed on your machine (we will use it to load data from; download it).
- Elasticsearch instance up and running.
- ZappySys SSIS PowerPack installed.
Step-by-Step – Bulk loading data from SQL Server to Elasticsearch with SSIS
Load data from SQL Server database first
In this section, you will perform several basic steps to start the package: load data from SQL Server and prepare it for further steps.
- Create a new SSIS package and drag a Data Flow Task into the Control Flow from the SSIS Toolbox.
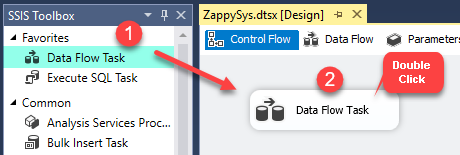
Dragging and dropping Data Flow Task into Control Flow
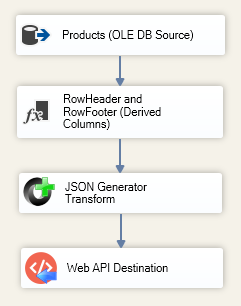
- Open Data Flow Task and then add OLE DB Source.
- Configure OLE DB Source to take data from Products table, Northwind database.
- Choose ProductID and ProductName as columns you will use.
Load data to Elasticsearch using SSIS and ZappySys Web API Destination component.
Transform data into JSON documents
To add data into Elasticsearch firstly we need to prepare it with JSON Generator Transform. It will help us convert table rows into JSON documents.
JSON String to Create Index data for the Bulk API call
- Close the window and then drag Derived Column component from the SSIS Toolbox.
- Furthermore, Add two new columns and name them
RowHeader and
RowFooter:
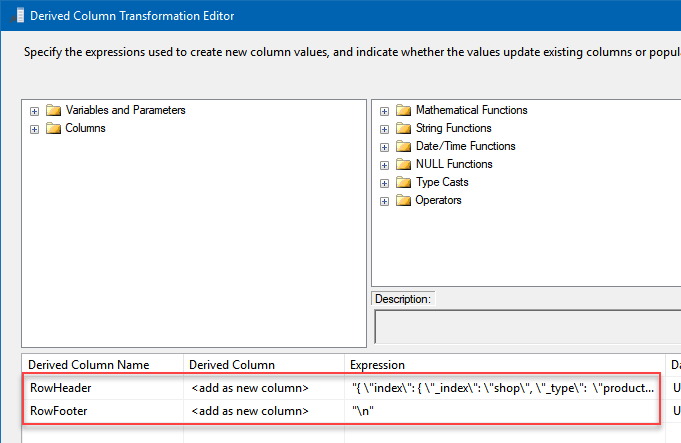
Derived Column configuration to add prefix and header and footer to a JSON
In the Expression column give them values:
- RowHeader:
1"{ \"index\": { \"_index\": \"shop\", \"_type\": \"products\", \"_id\" : \"" + (DT_WSTR,100)ProductID + "\" } }\n" - RowFooter: "\n"
- RowHeader:
- Now drag JSON Generator Transform from the SSIS Toolbox and open it.
- Right mouse click on item Mappings and select
Add Element(s) (Below this node):
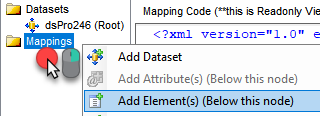
Convert SQL table rows into JSON using JSON Generator Transform
- Once a dialog appears, select
ProductName as Source Column and
name as Output Alias:
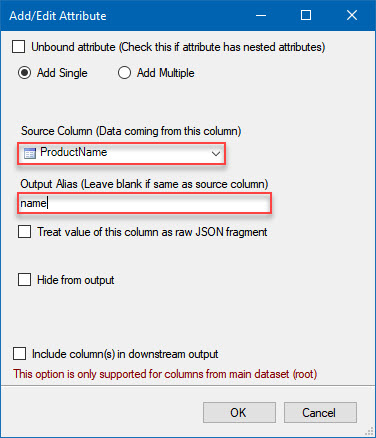
Map table column to JSON property using JSON Generator Transform
- You should get a similar view:

JSON Generator Transform configuration to create JSON from a SQL table
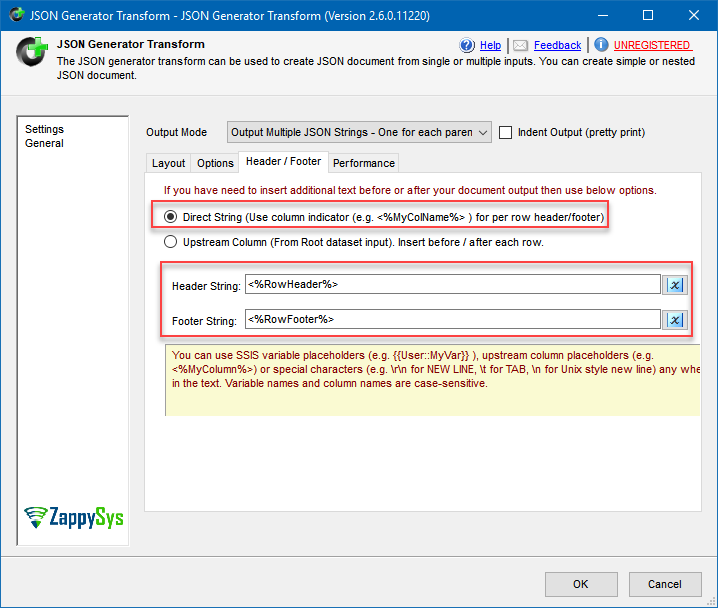
- Then go to Header / Footer tab and:
- Select Direct String option.
- Input <%RowHeader%> in Header String option.
- Input <%RowFooter%> in Footer String option.
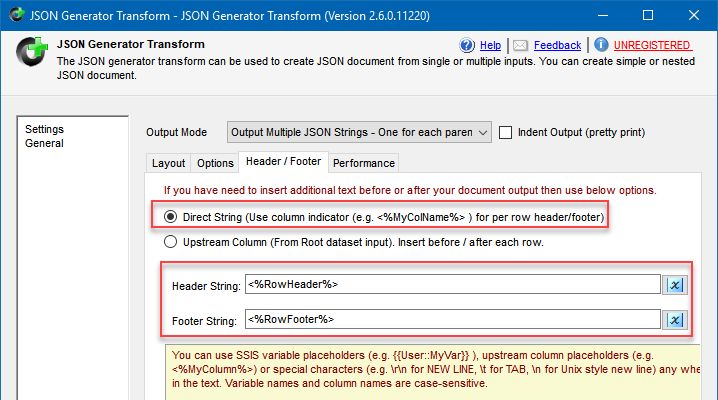
JSON Generator Transform configuration to convert rows into JSON suitable for Elasticsearch Bulk operation
- Close the window.


JSON String to Update Index data for the Bulk API call
From the above section “JSON String to Create Index data for the Bulk API call” follows all the steps From Step-1 to Step-8.
Just for (2nd step) Step-2 use below expression for
RowHeader and
RowFooter
Derived Column configuration to add prefix and header and footer to a JSONIn the Expression column give them values:
- RowHeader:
1"{ \"update\": { \"_index\": \"shop\", \"_id\" : \"" + (DT_WSTR,100)ProductID + "\" } }\n{ \"doc\" : " - RowFooter: "}\n"
JSON String to Delete Index data for the Bulk API call
From the above section “JSON String to Create Index data for the Bulk API call” follows steps Step-1 and Step-2.
Just for (2nd step) Step-2 use below expression for
RowHeader
Derived Column configuration to add prefix and header and footer to a JSON
In the Expression column give them values:
- RowHeader:
1"{ \"delete\": { \"_index\": \"shop\", \"_id\" : \"" + (DT_WSTR,100)ProductID + "\" } }\n"
Finally, Elasticsearch & SQL Server integration
- Now drag Web API Destination SSIS component into the Data Flow and open it for editing.
- In Select Connection section press
<New ZS-HTTP Connection>.
NOTE: If your ElasticSearch instance is hosted as AWS Managed Service then select <New ZS-OAUTH Connection>. rather than ZS-HTTP. When OAuth UI launches select AWS v4 Provider. For more information on calling REST API on AWS check this article. - Once HTTP Connection Manager window opens configure connection to your Elasticsearch instance:
- Set Web Url, which points to your Elasticsearch instance.
- Set Credentials Type to Basic - UserID/Password (or other appropriate authentication method).
- Finally, set User Name and Password:
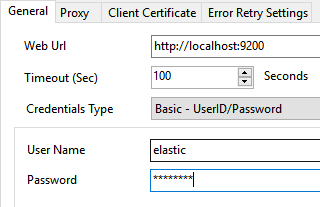
Configure SSIS HTTP Connection to connect to Elasticsearch
- Close configuration window. Now it’s time to configure Web API Destination.
- All that is separating you from getting those rows into Elasticsearch is:
- Setting Input Column for Body to ZS_JSON_OUT for Create and Update Index Data and for Delete Index Data Input Column for Body to RowHeader [Derived Column].
- Setting URL to http://localhost:9200/_bulk.
- Setting HTTP Request Method to POST.
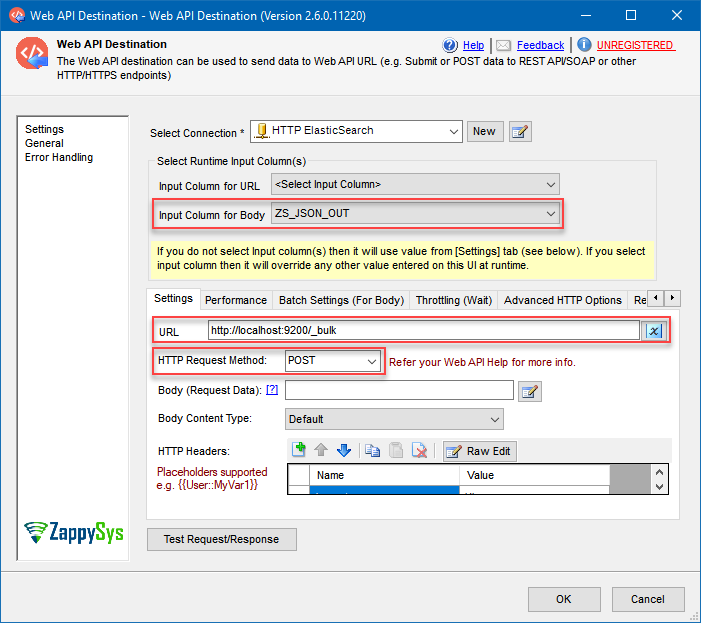
Index SQL Server Database data in Elasticsearch using SSIS component Web API Destination
- Then open Batch Settings (For Body) tab:
- Enable batch submission.
- Set Body Batch Size, e.g. 1000. Make sure this number is even, otherwise you may get into problems (Elasticsearch Bulk request has special JSON request body format, as you perhaps noticed).
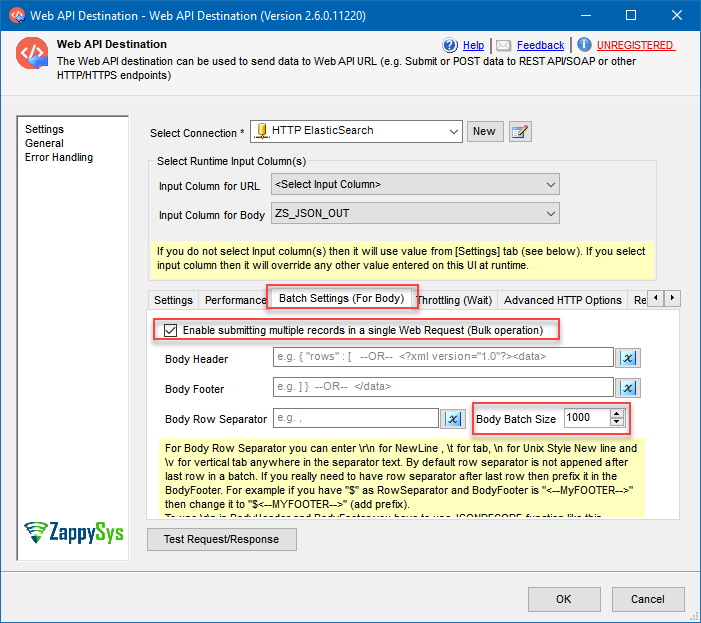
Web API Destination batch settings configuration
- Close the window and run the package! You should see green lights, telling you everything is OK:
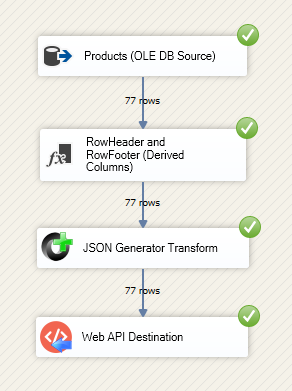
Successful data load from SQL Server to Elasticsearch
- We can also query Elasticsearch by using one of its Search APIs – URI Search to see if we successfully indexed data:
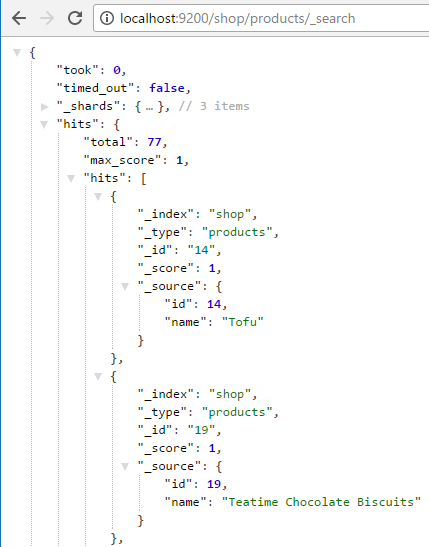
SQL Server data index in Elasticsearch
- Rows number match in SSIS and in search results, thus everything is good. You are done.


What if I want more? After upserting data use Web API Destination further
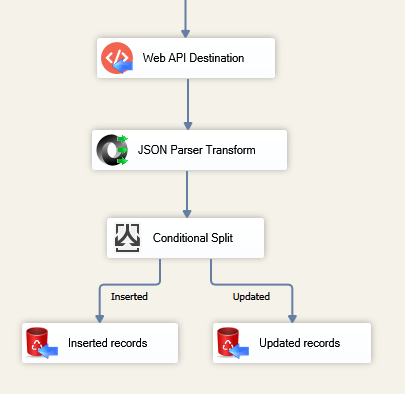
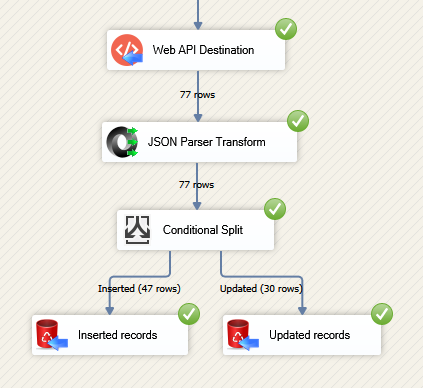
Let’s say you have a requirement to do something with rows that were freshly indexed in Elasticsearch. Then you will need somehow to distinguish between created and updated records in Elasticsearch. And that won’t be difficult because Web API Destination acts not only as Destination but as Transformation as well. So one thing you have to do is connect JSON Parser Transform downstream to Web API Destination. It will parse Elasticsearch HTTP JSON response – which is returned by Web API Destination – into columns, which you can later easily redirect using Conditional Split:
- Add JSON Parser Transform and connect it to Web API Destination:
Use JSON Parser Transform to get Elasticsearch HTTP JSON response when integrating SQL Server & Elasticsearch
- Make sure you have selected ResponseText as Select Input JSON Column.
- Then go to Bulk API and copy/paste “the result of this bulk operation” JSON response:
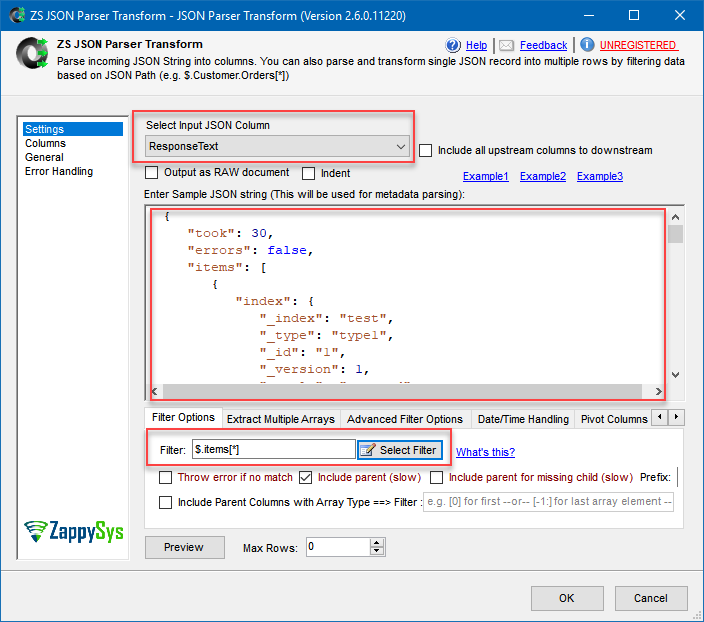
Using JSON Parser Transform to parse JSON response from REST HTTP request
- Set $.items[*] as the filter.
- Optional step. You won’t find a response sample for every Elasticsearch API call. In that case, you may want to use Postman to make an HTTP request to Elasticsearch and get a sample response:
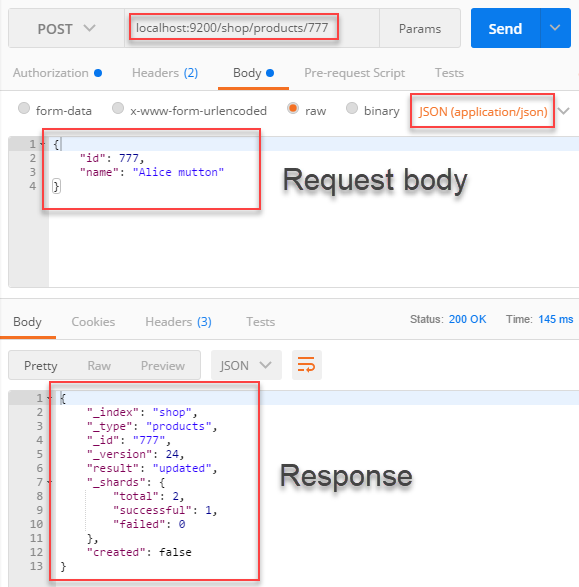
Use Postman to make a request to Elasticsearch and get a sample response to be used in JSON Parser Transform
NOTE: Don’t forget to set the username and password in Authorization section! - Then use a Conditional Split and Trash Destination to redirect the rows:
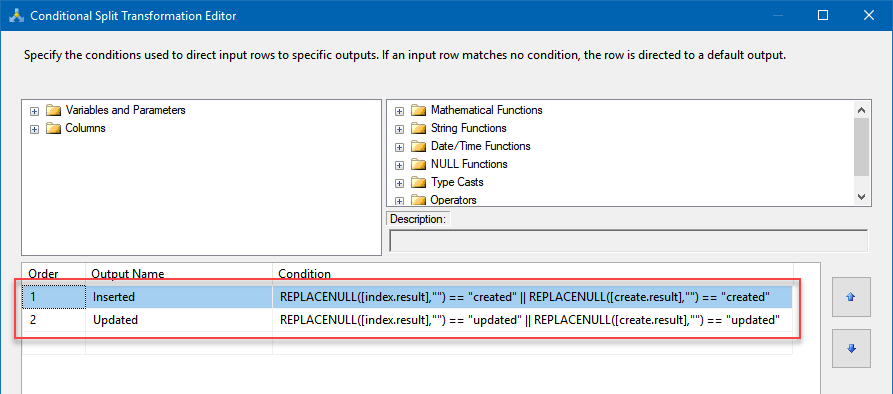
Input these clauses:- Inserted:
1REPLACENULL([index.result],"") == "created" || REPLACENULL([create.result],"") == "created" - Updated:
1REPLACENULL([index.result],"") == "updated" || REPLACENULL([create.result],"") == "updated"
- Inserted:
- As a result, new index records will be redirected to one destination, while updated records – to the other:


Overall you can use Web API Destination HTTP JSON response for other useful things as well, e.g. determine on how many replica shards record was indexed. JSON response will depend on which Elasticsearch API and which method you use.
Delete Index by making an API call.
If you want to delete the index by making Delete API call you can. Let’s make that call using the Rest API Task. Configure it like below screen and click on the Test Request button.
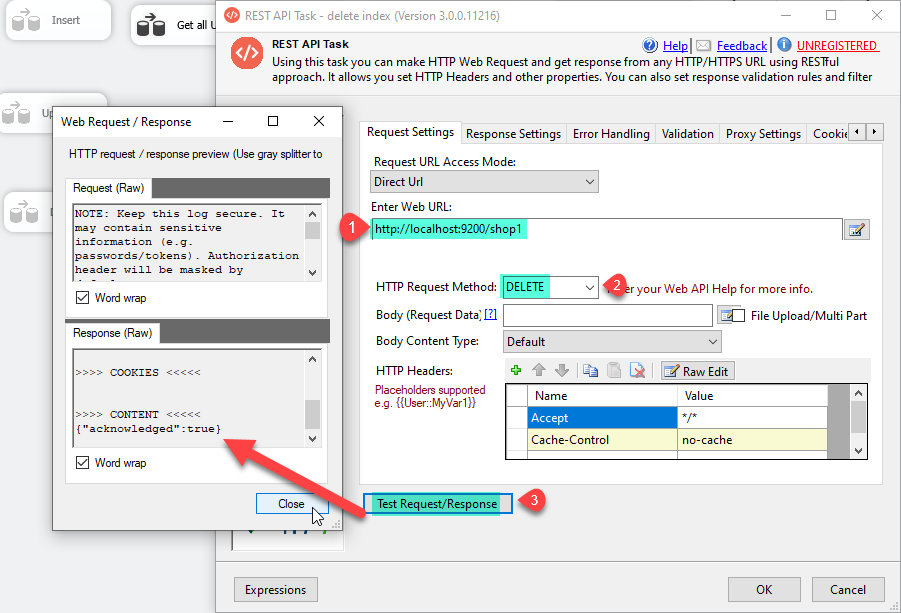
Rest API Delete Method
Things went bad: Error handling & debugging
Incidentally, you may incorrectly construct JSON for Web API Destination body. Elasticsearch nodes may go offline or go out of memory. In any case you may want to know when that happens and take actions accordingly. For that purpose you have to redirect failed requests from Web API Destination to some other destination:
- Add a Derived Column above Web API Destination with expression (DT_WSTR,4000)ZS_JSON_OUT and name it JsonAsString. This will let you see what JSON you are actually passing.
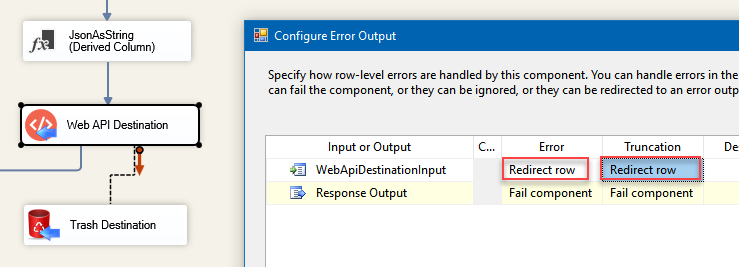
- After that, add database or file destination or use another Trash Destination for debugging purposes and redirect the bad rows (red arrow) from Web API Destination into it. Don’t forget to set
Redirect row option for both, Error and Truncation columns:
- Finally, add a Data Viewer for the red path, if you want to debug the flow. You will be able to see URL, JSON and the error message for each record. You may want to copy-paste ErrorMessage to Notepad if you want it to be more readable:
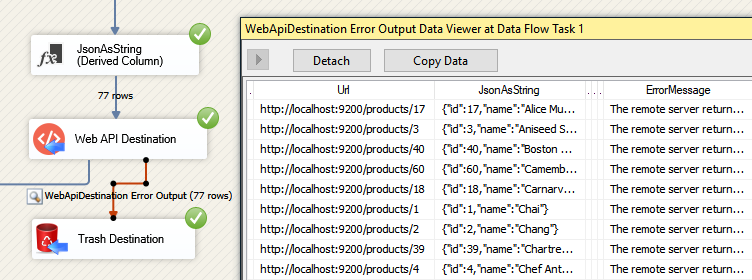
Use Data Viewer to view HTTP requests that failed to be fulfilled in Elasticsearch


Call ElasticSearch API hosted on AWS
If your ElasticSearch instance is hosted as AWS Managed ElasticSearch Instance then select <New ZS-OAUTH Connection>. rather than ZS-HTTP (Explained later in this article). When OAuth UI launches select AWS v4 Provider. For more information on calling REST API on AWS check this article.

Call AWS Hosted ElasticSearch REST API in SSIS (V4 Request Signing)
Common Errors
The most common error you may face when you run an SSIS package is truncation error. During the design time only 300 rows are scanned from a source (a file or a REST API call response) to detect datatypes but at runtime, it is likely you will retrieve far more records. So it is possible that you will get longer strings than initially expected. For detailed instructions on how to fix common metadata related errors read an article "How to handle SSIS errors (truncation, metadata issues)".
Another frequent error you may get is an authentication error, which happens when you deploy/copy a package to another machine and run it there. Check the paragraph below to see why it happens and how to solve this problem.
Deployment to Production
In SSIS package sensitive data such as tokens and passwords are by default encrypted by SSIS with your Windows account which you use to create a package. So SSIS will fail to decrypt tokens/passwords when you run it from another machine using another Windows account. To circumvent this when you are creating an SSIS package which uses authentication components (e.g. an OAuth Connection Manager or an HTTP Connection Manager with credentials, etc.), consider using parameters/variables to pass tokens/passwords. In this way, you won’t face authentication related errors when a package is deployed to a production server.
Check our article on how to configure packages with sensitive data on your production or development server.
Download a sample package
Be sure to download a sample SQL Server 2008 SSIS package, in case you want to try it right away (you can upgrade it to a higher version).
Conclusion. What’s next?
In conclusion, in this article we have learned how to bulk load data from SQL Server and upsert it in Elasticsearch index. We used JSON Generator Transform to help us convert database table rows into JSON documents. In addition, Web API Destination was very helpful in automatically creating and making HTTP requests to Elasticsearch instance and indexing our data as a result. This tutorial was quite simple and straightforward, yet it is a good starter to use other Elasticsearch APIs and their features. From now on Elasticsearch reference is your best friend in learning what APIs exist, what are their methods and how HTTP requests should look like.
Keywords
How to import data from SQL Server to Elasticsearch | How to load data into Elasticsearch | Using Elasticsearch to index SQL Server | Elasticsearch and SQL Server integration | How to use Elasticsearch together with SQL Server | Upsert SQL Server data into Elasticsearch