Introduction
 In this article, we will cover the points on how to load 10 million rows from SQL Server to Snowflake in just 3 minutes.
Snowflake is a data warehousing platform that resides in a cloud. Basically, it is a data warehouse software exposed as a service. It allows integrating many data sources via internal Snowflake Partner apps and loading them into the Snowflake storage engine. Another part of Snowflake is a computing engine that is responsible for serving your SQL queries. Both engines can work independently thus users that are querying a data warehouse are not affected by a data load that is happening at the same time. Snowflake is an elastic service, which means you pay only for the resources used. Specifically, you pay only for each second of the processing time you use.
To show how data loading works in Snowflake, we will take 10 million rows from SQL Server and load them into Snowflake using SSIS and ZappySys SSIS PowerPack. These SSIS PowerPack connectors will be used to achieve the task:
Prerequisites
Before we perform the steps listed in this article, you will need to make sure the following prerequisites are met:- SSIS designer installed. Sometimes it is referred to as BIDS or SSDT (download it from the Microsoft site).
- Basic knowledge of SSIS package development using Microsoft SQL Server Integration Services.
- Make sure ZappySys SSIS PowerPack is installed (download it, if you haven't already).
- (Optional step). Read this article, if you are planning to deploy packages to a server and schedule their execution later.
Step-by-step – How to load 10 million rows from SQL Server to Snowflake in 3 minutes
Getting started
To achieve the goal, we will use a slightly modified Northwind database (example database from Microsoft) and SnowSQL – a command-line tool provided by Snowflake. So in the first steps, you will need to install the Northwind database and SnowSQL. After that, we will proceed to create a table in Snowflake – a table we will load the data into – and a file format which will be used to load data from the Snowflake staging area into the destination table. Once that’s complete, we will proceed in creating an SSIS package, adding and configuring the connectors, and finally running it to get the results. Let’s proceed!
Install a Northwind database
Download and run the creation script of a modified Northwind database. The only thing that was modified is a “CustomersForSnowflake” view added which returns 10M rows.
Install and configure SnowSQL command-line tool
Download and install SnowSQL; you will find the instructions on how to do that in https://docs.snowflake.net/manuals/user-guide/snowsql-install-config.html.
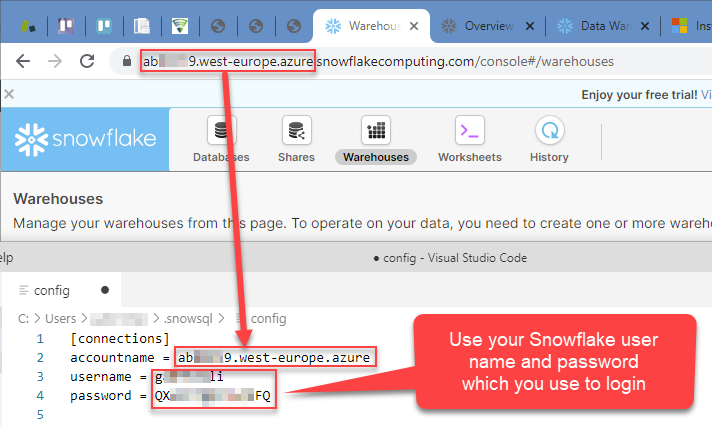
Once installed, you will need to configure the default Snowflake account name, user name, and password:
- Go to Windows File Explorer and enter this path:
%USERPROFILE%\.snowsql\
Usually, when entered the path looks similar to this one:
C:\Users\myUserName\.snowsql - Find a file named config and open it.
- Then configure your credentials:
Create a table in Snowflake
Login to your Snowflake account, open a Worksheet and execute this query:
create or replace table Customers(

ID number,

CustomerID nchar(5),

CompanyName nvarchar(40),

ContactName nvarchar(30),

ContactTitle nvarchar(30),

Address nvarchar(60),

City nvarchar(15),

Region nvarchar(15),

PostalCode nvarchar(10),

Country nvarchar(15),

Phone nvarchar(24),

Fax nvarchar(24)

)
We will load 10M customers from the Northwind database and load them into this table.
Create a file format in Snowflake
Then in the same Worksheet create a file format for zipped CSV files by executing this query:
create or replace file format GzipCsvFormat

type = csv

field_delimiter = ','

null_if = ('NULL', 'null')

empty_field_as_null = true

compression = gzip

field_optionally_enclosed_by = '"'
We will use this file format when loading data from a Snowflake stage to the Snowflake destination table. This file format defines CSV format which is used by ZappySys Export CSV Task in SSIS.
Create an SSIS package
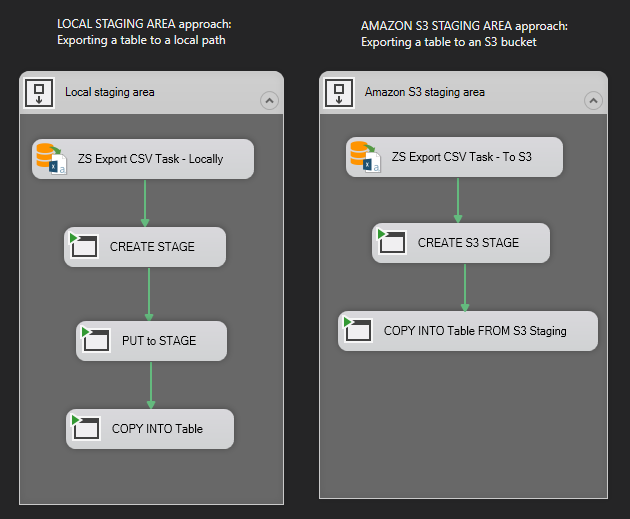
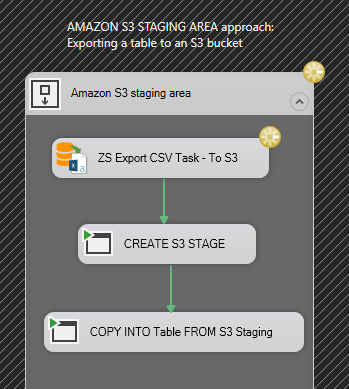
We are ready to create a new SSIS package and load some data into Snowflake. We are going to use two methods of how we load data into Snowflake. In one method we will load data into Snowflake’s local storage, while in the second one we will stage data in Amazon S3 bucket. Decide how you want to stage files, and then choose the appropriate workflow when creating a new package:
Loading 10 million rows from SQL Server to Snowflake
Add & configure ZappySys Export CSV Task
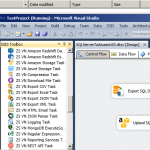
Firstly, drag and drop ZappySys Export CSV Task from SSIS toolbox and follow the instructions on how to configure it:
Configure source
- Proceed with configuring the data source, from which you will be exporting data. We will use the Northwind database as an example:
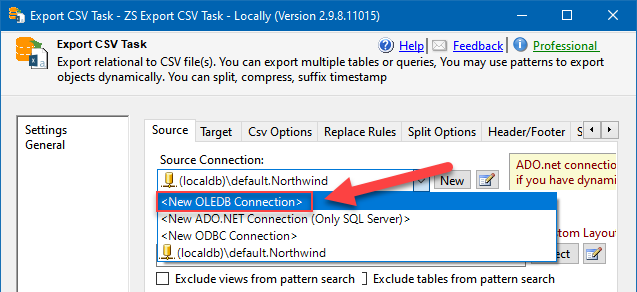
Export CSV Task: configuring OLE DB Connection to export data from SQL Server to Snowflake
- Then move on and select it and enter the query or table name you want to export data from:
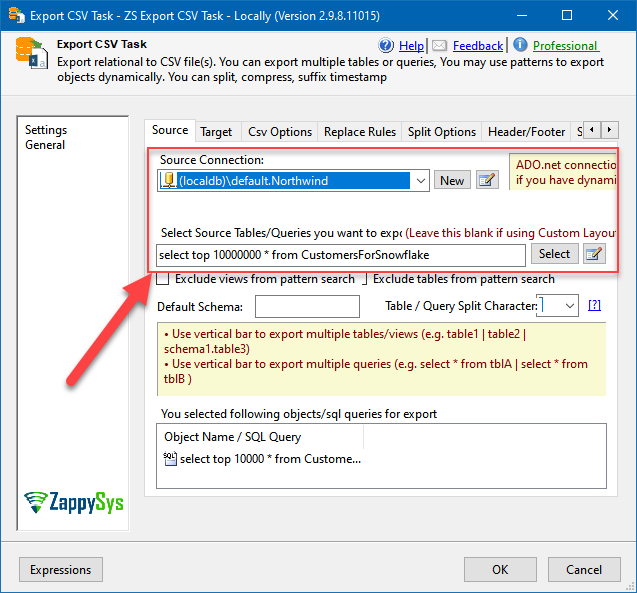
Export CSV Task: configuring source SQL query for data loading from SQL Server to Snowflake
We will be using this query:
select top 10000000 * from CustomersForSnowflake - Then in the Split Options tab split the exported CSV into many files, e.g. into 50 MB chunks:
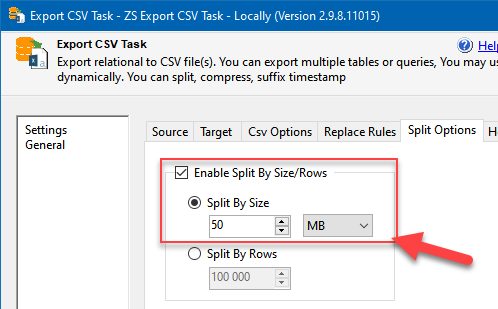
Using data split options in the Export CSV Task
NOTE: Snowflake recommends having files that are 10-100 MB in size when compressed. So it is perfectly safe to configure the value to 100 MB and above.
Configure target
Depending on which staging approach you chose to use, set the export target to a local path or S3 bucket:
Using local Snowflake storage
Just set the appropriate Save Mode and a file path:
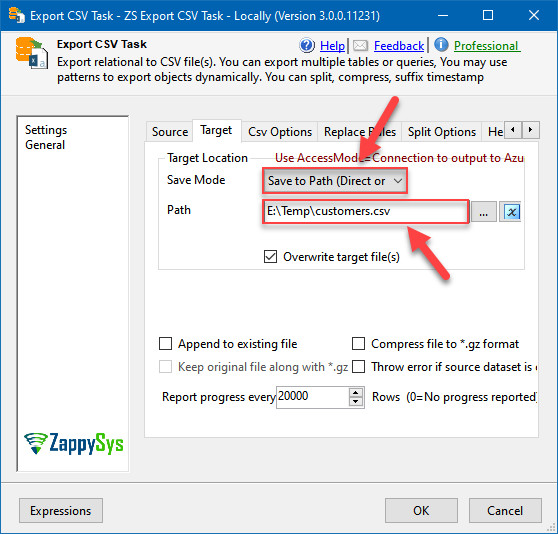
Saving files locally to upload them to Snowflake local stage later
Using S3 storage
For storing staging files in S3, follow these steps:
- Set Save Mode to Save to Connection and select <New ZS-AWS-STORAGE Connection>:
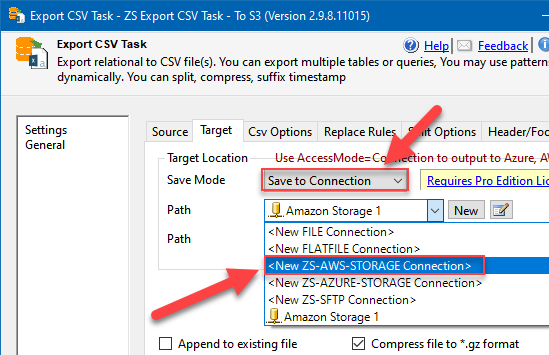
Export CSV Task: configuring Amazon S3 endpoint as the target for data export
- Then select S3 as Storage Service and fill in Access and Secret Key, select your region (optional):
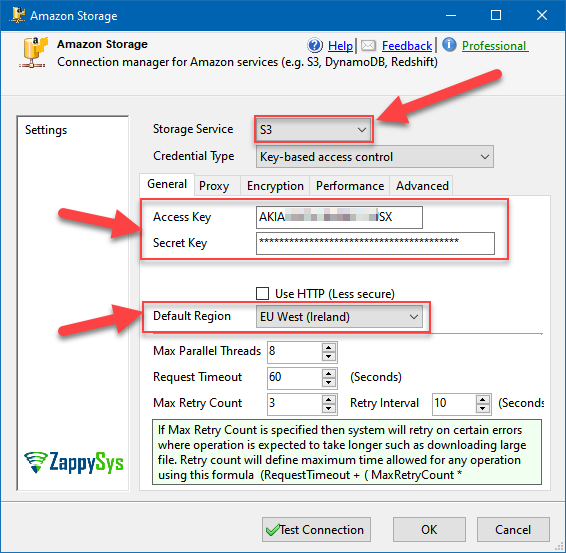
Configuring Amazon Connection Manager to store staging data in S3
- Then in the Export CSV Task window, in Target tab configure it similarly:
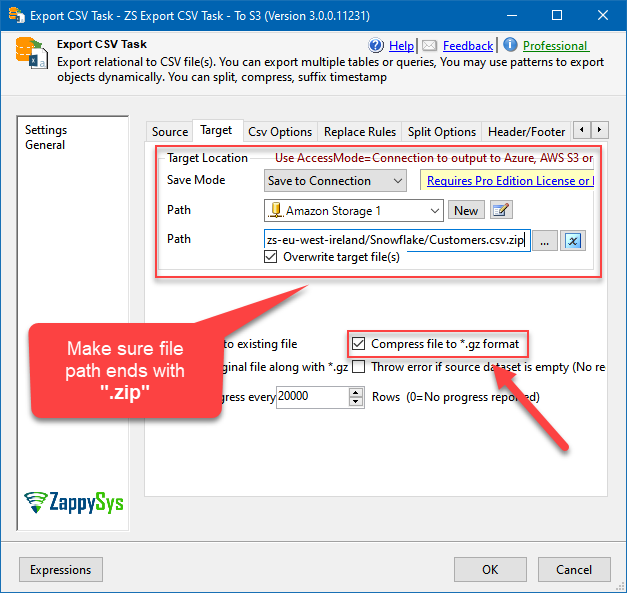
Export CSV Task: configuring target to store staging data in S3
Add Execute Process Task to create a staging area
We are ready to add Execute Process Task to create a staging area in Snowflake. Again, depending on where you will store staging files, Snowflake’s local storage or Amazon S3, use one of the approaches below:
Create Snowflake local staging
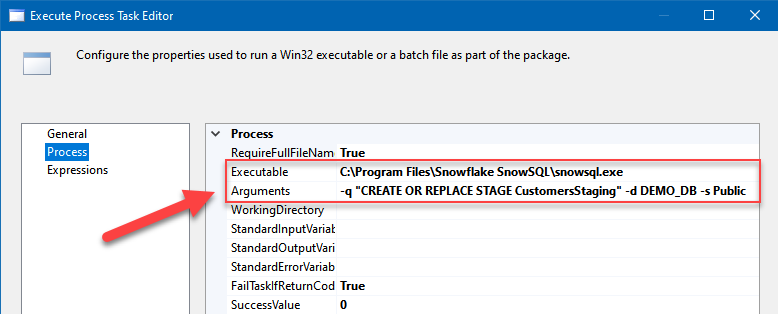
Creating a local stage in Snowflake using SnowSQL command-line tool and SSIS
File path:
C:\Program Files\Snowflake SnowSQL\snowsql.exe
Arguments:
-q "CREATE OR REPLACE STAGE CustomersStaging" -d DEMO_DB -s Public
Create Amazon S3 staging
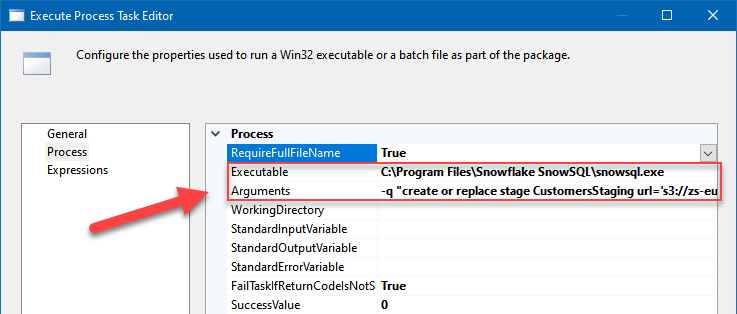
Creating an Amazon S3 stage in Snowflake using SnowSQL command-line tool and SSISFile path:
C:\Program Files\Snowflake SnowSQL\snowsql.exe
Arguments:
CREATE OR REPLACE STAGE CustomersStaging url='s3://your-bucket-name/destinationFolder/' credentials=(aws_key_id='AKIAXXXXXXXXXXXXXXXX' aws_secret_key='6p1ayaaaaaaaaaaaaaaaaaaaaaaaaaaaaaaLXz88')
Add Execute Process Task to upload files to the staging area (local staging approach only)
We still need to upload CSV files that were saved locally for local Snowflake staging. So add another Execute Process Task and configure it similarly:
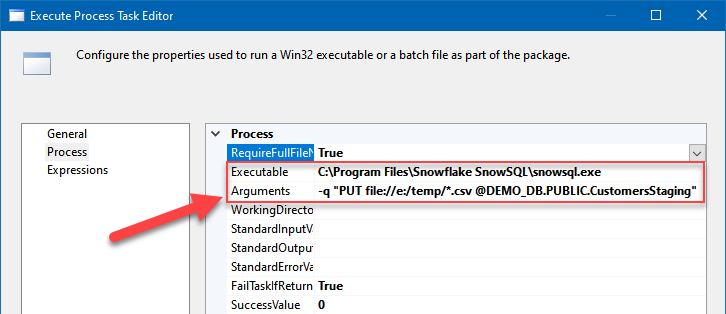
Uploading local CSV files to Snowflake stage using SnowSQL command-line tool and SSISFile path:
C:\Program Files\Snowflake SnowSQL\snowsql.exe
Arguments:
-q "PUT file://e:/temp/*.csv @DEMO_DB.PUBLIC.CustomersStaging"
Add Execute Process Task to copy files from the Snowflake/Amazon S3 stage to Snowflake table
Finally, add the final Execute Process Task to issue a command to load files from the stage into a real Snowflake table:
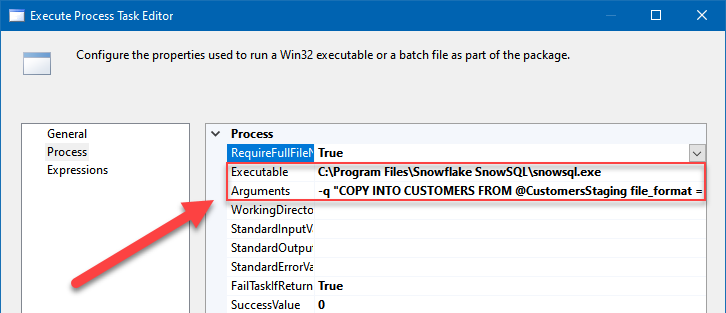
Copying data from a staging area to a Snowflake table using SSIS
File path:
C:\Program Files\Snowflake SnowSQL\snowsql.exe
Arguments:
-q "COPY INTO CUSTOMERS FROM @CustomersStaging file_format = (format_name = 'GZIPCSVFORMAT')" -d DEMO_DB -s Public
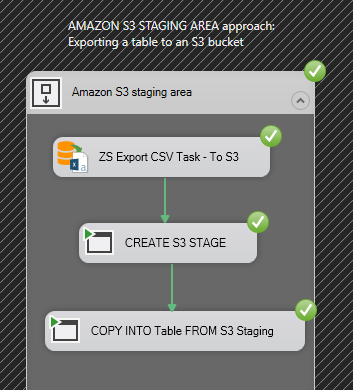
Execute the package
We are ready to execute the package, so just run it. In this example you see the workflow when using Amazon S3 as stage:
Executing an SSIS package to load data from Snowflake to SQL Server
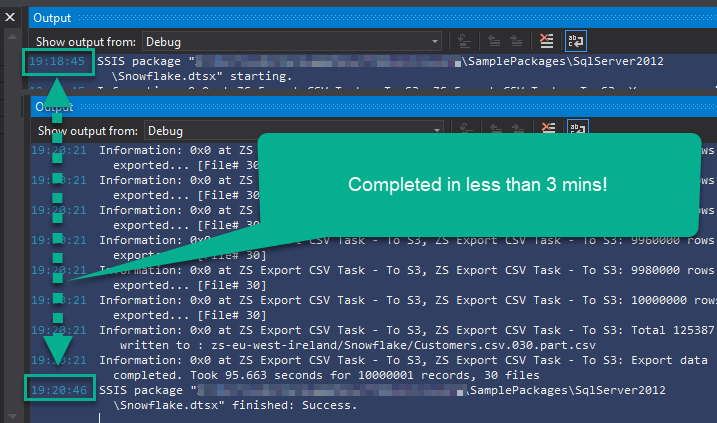
The Results
Once the package executes, we can check the results:
Successful execution of SSIS package when loading data from Snowflake to SQL Server
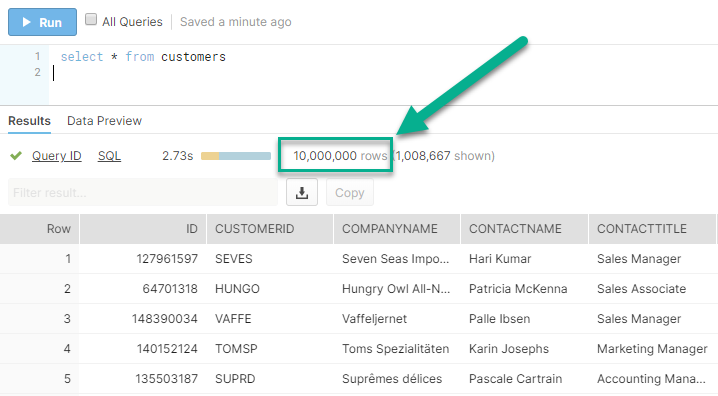
If we go to Snowflake and execute the SELECT query, we see all 10M customers loaded:
Successful loading of 10 million rows from SQL Server to Snowflake using SSIS and ZappySys SSIS PowerPack
All done in less than 3 mins:
Conclusion
We achieved just what we aimed for – we loaded 10 million rows from SQL Server to Snowflake; all done in less than 3 minutes! Two approaches were taken into consideration: in one we staged CSV files in the local Snowflake stage and in the other we staged files in the Amazon S3 bucket. To accomplish this we used ZappySys Export CSV Task, which allowed us to export data from the SQL Server view to CSV format, split files into smaller ones, zip them and store them locally or upload to the Amazon S3 bucket. Finally, we used a standard SSIS Task “Execute Process Task” to issue Snowflake commands such as creating the stage area in Snowflake, uploading CSVs into the local stage and loading data into the Snowflake table.
Download a sample package
Load 10M rows from SQL Server into Snowflake.dtsx.zip
References
https://docs.snowflake.net/manuals/user-guide/data-load-bulk.html
https://docs.snowflake.net/manuals/user-guide/snowsql.html
https://docs.snowflake.net/manuals/user-guide/data-load-s3-create-stage.html
https://docs.snowflake.net/manuals/sql-reference/sql/create-file-format.html
https://docs.snowflake.net/manuals/sql-reference/sql/put.html
https://docs.snowflake.net/manuals/sql-reference/sql/copy-into-table.html