Introduction
In this post, we will see how to create SSIS Package Programmatically to use ZappySys SSIS PowerPack. This blog post assumes you have basic knowledge of Programming language like C# and you have installed Visual Studio Express or a similar product (VS Code not supported).
Prerequisites
Before we perform the steps listed in this article, you will need to make sure the following prerequisites are met:- SSIS designer installed. Sometimes it is referred to as BIDS or SSDT (download it from the Microsoft site).
- Basic knowledge of SSIS package development using Microsoft SQL Server Integration Services.
- Make sure ZappySys SSIS PowerPack is installed (download it, if you haven't already).
- (Optional step). Read this article, if you are planning to deploy packages to a server and schedule their execution later.
Add SSIS Dll References
The very first thing is to create a C# Project (i.e. Console or WinForm). Add SSIS dll reference.
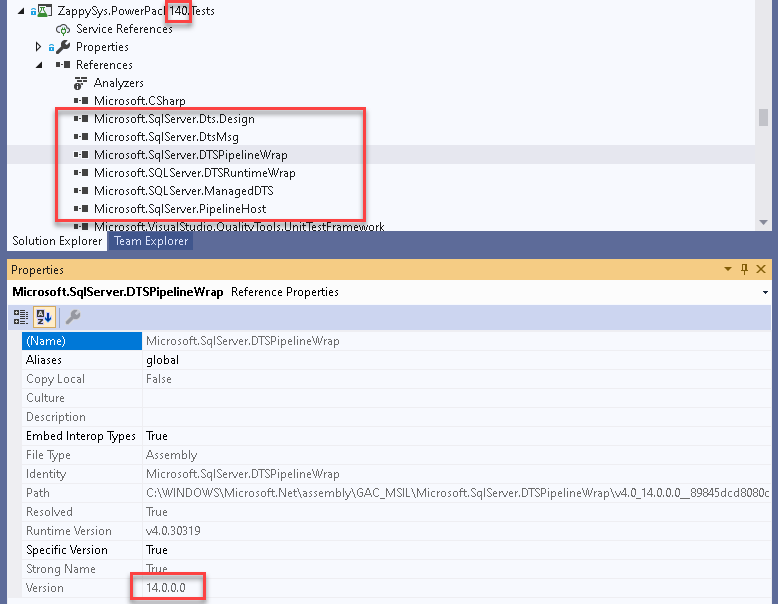
You will need the following references in your project. The below example is for SSIS 2017 (Version 14.x.x)
- For SSIS 2012 change to Version=11.0.0.0
- For SSIS 2014 change to Version=12.0.0.0
- For SSIS 2016 change to Version=13.0.0.0
- For SSIS 2017 change to Version=14.0.0.0
- For SSIS 2019 change to Version=15.0.0.0
- And may be future versions same way ….
|
1 2 3 4 5 |
<Reference Include="Microsoft.SqlServer.Dts.Design"/> <Reference Include="Microsoft.SqlServer.DTSPipelineWrap" /> <Reference Include="Microsoft.SQLServer.DTSRuntimeWrap" /> <Reference Include="Microsoft.SQLServer.ManagedDTS" /> <Reference Include="Microsoft.SqlServer.PipelineHost" /> |
Step-By-Step Example (Create SSIS Package Programmatically – C#)
Now let’s see each piece to create SSIS Package in code and later we will show the full code.
Import Namespaces
First step is at the top you need to import some namespaces.
|
1 2 3 4 |
using Microsoft.SqlServer.Dts.Runtime; using Microsoft.SqlServer.Dts.Pipeline; //using Microsoft.SqlServer.Dts.Pipeline.Wrapper; //using Microsoft.SqlServer.Dts.Runtime.Wrapper; |
Create SSIS Package
Here how you can create SSIS Package instance in code
|
1 |
var p = new Package(); |
Add SSIS Connection
Now lets add connection manager to our package instance. To add connection you will need two pieces. Creation Name (i.e. ZS-SFTP) and ConnectionString. You can find creation name from exsing Dtsx file by opening in text editor.
|
1 2 3 |
var conn1=p.Connections.Add("ZS-SFTP"); conn1.Name = "MySftpConnection"; conn1.ConnectionString= "Protocol=Sftp;ServerName=127.0.0.1;Port=0;LogonType=Normal;UserName=zstest;Password=zstest123"; |
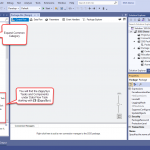
How to find CreationName of SSIS Connection manager
To find the creation name of your Connection Type open an existing DTSX file where you had similar connection type in the package. Locate node like below and check CrewationName. It can be a friendly name or can be fully qualified assembly name. Both ways is fine but a friendly name is easy to remember.
|
1 2 3 4 5 6 |
<DTS:ConnectionManagers> <DTS:ConnectionManager DTS:refId="Package.ConnectionManagers[RedshiftConn1]" DTS:CreationName="ZS-POSTGRESQL" ......... ......... |
How to find ConnectionString
Now another thing you need to know is the exact connectionstring. You can go to SSIS Designer and right-click on Connection Icon and check Properties Grid. It will show you ConnectionString or you can use the above technique > Open DTSX file in notepad and find connectinstring there.
ConnectionString doesnt include any passwords / secrets. So manually append those properties in your connectionstring when you set in code.
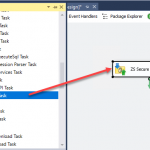
Add SSIS Task
Now let’s add task in our SSIS Package instance. To create SSIS Task programmatically in code, you need to know the exact type name (i.e. creation name). As we discussed earlier check your dtsx file to know the creation name for the task you like to create. In the below code we used a friendly name which is not supported in SSIS 2012 so for that you must use full name. For SSIS 2014 or higher you can use friendly names.
You can also find it in file like this (example of SSIS 2017 and 2019 folders)
C:\Program Files (x86)\Microsoft SQL Server\140\DTS\UpgradeMappings\ZappySys.PowerPack140.Extensions.xml
C:\Program Files (x86)\Microsoft SQL Server\150\DTS\UpgradeMappings\ZappySys.PowerPack150.Extensions.xml
|
1 2 3 4 5 6 7 8 9 10 11 12 13 14 15 |
//var SSIS_VERSION = "110"; //110=SQL2012, 120=SQL2014, 130=SQL2016, 140=SQL2017, 150=SQL2019 //For SSIS 2012 var SFTP_TASK_2012 = "ZappySys.PowerPack.Task.SecureFtpTask.SecureFtpTask, ZappySys.PowerPack110, Version=1.0.0.0, Culture=neutral, PublicKeyToken=1903265a93eae502"; //For SSIS 2014 or higher //Goto folder like this and find zappysys extension file //(e.g. 140) => C:\Program Files (x86)\Microsoft SQL Server\140\DTS\UpgradeMappings\ZappySys.PowerPack140.Extensions.xml //Find Task creation name there var SFTP_TASK = "ZappySys.SecureFtpTask"; var tsk1 = p.Executables.Add(SFTP_TASK) as TaskHost; tsk1.Properties["SourceStorageConnection"].SetValue(tsk1, "MySftpConnection"); tsk1.Properties["StorageAction"].SetValue(tsk1, 10); //DownloadFileFromFtp [10] find numeric value for this enum from help file> properties https://zappysys.com/onlinehelp/ssis-powerpack/scr/ssis-sftp-ftp-ftps-task.htm tsk1.Properties["SourcePathValue"].SetValue(tsk1, "subfolder/localsubfile1.csv"); tsk1.Properties["TargetPathValue"].SetValue(tsk1, @"c:\temp\"); tsk1.Properties["FileOverwriteAction"].SetValue(tsk1, 2); //OverwriteAll [2] |
Execute SSIS Package
Now let’s execute the package using the below line
|
1 |
var status =p.Execute(); |
Check Execution Errors
At the end you need to check execution errors if any.
|
1 2 3 4 5 6 |
if (status != DTSExecResult.Success) { string errs = p.Errors.Cast<DtsError>().Aggregate("", (current, err) => current + string.Format("Source={0}, Err={1}", err.Source, err.Description)); throw new Exception("Package status was >> " + status + " >> " + errs); } |
Full Code
Here is the full code
|
1 2 3 4 5 6 7 8 9 10 11 12 13 14 15 16 17 18 19 20 21 22 23 24 25 26 27 28 29 30 31 32 33 34 35 36 37 38 39 40 41 42 43 44 45 46 47 48 49 50 51 52 53 54 55 56 57 58 59 60 61 62 63 64 65 66 67 68 69 70 71 72 73 74 75 76 77 78 79 80 81 82 83 84 85 86 87 88 89 90 91 92 93 94 95 96 97 98 99 100 101 102 103 104 105 106 107 108 109 110 111 112 113 114 115 116 117 118 119 120 121 122 123 124 125 126 127 128 129 130 131 132 133 134 135 136 137 138 139 140 141 142 143 144 145 146 147 148 149 150 151 152 153 154 155 156 157 158 159 160 161 162 163 164 165 166 167 168 169 170 171 172 173 174 175 176 177 178 179 180 181 182 183 184 185 186 187 188 189 190 191 192 193 194 195 196 197 198 199 200 201 202 203 204 205 206 207 208 209 210 211 212 213 214 215 216 217 218 219 220 221 222 223 224 225 226 227 228 229 230 231 232 233 234 235 236 237 238 239 240 241 242 243 244 245 246 247 248 249 250 251 252 253 254 255 256 257 258 259 260 261 262 263 264 265 266 267 268 269 270 271 272 273 274 275 276 277 278 279 280 281 282 283 284 285 286 287 288 289 290 291 292 293 294 295 296 297 |
using System; using System.Linq; using System.Runtime.InteropServices; using Microsoft.SqlServer.Dts.Pipeline.Wrapper; using Microsoft.SqlServer.Dts.Runtime; /* For SSIS 2012 - Compile with .net 4.0 For SSIS 2014-2017 - Compile with .net 4.5 For SSIS 2019 - Compile with .net 4.6.2 */ //current one is SSIS 2017 (140 dlls) /* * References needed for SSIS 2017 , for 2019 change 14.0.0.0 to 15.0.0.0 * <Reference Include="Microsoft.SqlServer.DtsMsg, Version=14.0.0.0, Culture=neutral, PublicKeyToken=89845dcd8080cc91, processorArchitecture=MSIL" /> <Reference Include="Microsoft.SqlServer.Dts.Design, Version=14.0.0.0, PublicKeyToken=89845dcd8080cc91" /> <Reference Include="Microsoft.SqlServer.DTSPipelineWrap, Version=14.0.0.0, Culture=neutral, PublicKeyToken=89845dcd8080cc91, processorArchitecture=MSIL" /> <Reference Include="Microsoft.SQLServer.DTSRuntimeWrap, Version=14.0.0.0, Culture=neutral, PublicKeyToken=89845dcd8080cc91" /> <Reference Include="Microsoft.SQLServer.ManagedDTS, Version=14.0.0.0, Culture=neutral, PublicKeyToken=89845dcd8080cc91, processorArchitecture=MSIL" /> <Reference Include="Microsoft.SqlServer.PipelineHost, Version=14.0.0.0, Culture=neutral, PublicKeyToken=89845dcd8080cc91, processorArchitecture=MSIL" /> */ namespace SSISCodeDemo { class Program { static void Main(string[] args) { //Create_SSIS_Controlflow_Task_Demo(); Create_SSIS_Dataflow_Source_Component_Demo(); //Create_SSIS_Connection_Demo(); //Create_SSIS_Variable_Demo(); //Create_SSIS_Connect_Tasks_Demo(); } private static void Create_SSIS_Controlflow_Task_Demo() { var p = new Microsoft.SqlServer.Dts.Runtime.Package(); var conn1 = p.Connections.Add("ZS-SFTP"); conn1.Name = "MySftpConnection"; conn1.ConnectionString = "Protocol=Sftp;ServerName=127.0.0.1;Port=0;LogonType=Normal;UserName=zstest;Password=zstest123"; //var SSIS_VERSION = "110"; //110=SQL2012, 120=SQL2014, 130=SQL2016, 140=SQL2017, 150=SQL2019 //For SSIS 2012 var SFTP_TASK_2012 = "ZappySys.PowerPack.Task.SecureFtpTask.SecureFtpTask, ZappySys.PowerPack110, Version=1.0.0.0, Culture=neutral, PublicKeyToken=1903265a93eae502"; //For SSIS 2014 or higher //Goto folder like this and find zappysys extension file (e.g. 140) => C:\Program Files (x86)\Microsoft SQL Server\140\DTS\UpgradeMappings\ZappySys.PowerPack140.Extensions.xml //Find Task creation name there var SFTP_TASK = "ZappySys.SecureFtpTask"; var tsk1 = p.Executables.Add(SFTP_TASK) as TaskHost; tsk1.Name = "SFTP_Task1"; tsk1.Properties["SourceStorageConnection"].SetValue(tsk1, "MySftpConnection"); tsk1.Properties["StorageAction"].SetValue(tsk1, 10); //DownloadFileFromFtp [10] find numeric value for this enum from help file> properties https://zappysys.com/onlinehelp/ssis-powerpack/scr/ssis-sftp-ftp-ftps-task.htm tsk1.Properties["SourcePathValue"].SetValue(tsk1, "subfolder/localsubfile1.csv"); tsk1.Properties["TargetPathValue"].SetValue(tsk1, @"c:\temp\"); tsk1.Properties["FileOverwriteAction"].SetValue(tsk1, 2); //OverwriteAll [2] /* Go to package file (*.dtsx) > Open in Notepad > and findout which properties set. Do same way (ignore some default proprties) Some enum properties needs numeric values > Check Task / Component help file to findout number for that <DTS:ObjectData> <SecureFtpTask StorageAction="DeleteFtpFile" FileOverwriteAction="OverwriteAll" TreatRegXForFullPath="False" ContinueOnError="False" ................... ................... ................... PrefixTimestamp="False" /> </DTS:ObjectData> </DTS:Executable> */ //Application. /* use below code to save to disk file var app = new Microsoft.SqlServer.Dts.Runtime.Application(); var filepath = @"c:\temp\demo.dtsx"; app.SaveToXml(filepath, p, null); --load from disk to memory p = app.LoadPackage(filepath, null); */ var status = p.Execute(); if (status != DTSExecResult.Success) { var errs = ""; foreach (var e in p.Errors) { errs = errs + string.Format("Source={0}, Err={1}", e.Source, e.Description) + "\r\n"; } throw new Exception("Package status was >> " + status + " >> " + errs); } Console.WriteLine("Execution Completed... Press any key to exit!!!"); Console.ReadKey(); } private static void Create_SSIS_Dataflow_Source_Component_Demo() { var p = new Microsoft.SqlServer.Dts.Runtime.Package(); /*============ STEP-1: Create Dataflow Task =========== */ var tsk1 = p.Executables.Add("STOCK:PipelineTask") as TaskHost; var dataFlowTask = tsk1.InnerObject as MainPipe; /*============ STEP-2: Create Connection =========== */ var conn1 = p.Connections.Add("ZS-HTTP"); conn1.Name = "MyConnection"; conn1.ConnectionString = "Url=https://httpbin.org/get;CredentialType=Basic;UserName=test;Password=test123"; /*============ STEP-3: Create Source =========== */ var sourceComponent = dataFlowTask.ComponentMetaDataCollection.New(); try { sourceComponent.ComponentClassID = "ZappySys.JsonSource"; var sourceInstance = sourceComponent.Instantiate(); sourceInstance.ProvideComponentProperties(); sourceComponent.Name = "MySource"; /**** Special Case for JSON Source - if user wants connection to use then we create Runtime connection. For all other components this is always created when ProvideComponentProperties() is called*/ if (sourceComponent.RuntimeConnectionCollection.Count <= 0) { var dtsRuntimeConnection = sourceComponent.RuntimeConnectionCollection.New(); dtsRuntimeConnection.Name = "Connection"; //dtsRuntimeConnection.Description = "This can be ZS-HTTP, ZS-OAUTH or ZS-SALESFORCE"; } sourceComponent.RuntimeConnectionCollection[0].ConnectionManager = DtsConvert.GetExtendedInterface(conn1); sourceComponent.RuntimeConnectionCollection[0].ConnectionManagerID = conn1.ID; sourceInstance.SetComponentProperty("UseConnection", true);//JsonSource specific -- for all other components connection always used sourceInstance.SetComponentProperty("DirectPath", "https://httpbin.org/basic-auth/test/test123"); //sourceInstance.SetComponentProperty("Filter", "$.value[*]"); //make connection active before next step sourceInstance.AcquireConnections(null); //after connection + props set ... call ReInitialize meta... it creates columns / output / input etc sourceInstance.ReinitializeMetaData(); } catch (COMException ex) { throw new Exception("Error Happened ==> " + sourceComponent.GetErrorDescription(ex.ErrorCode)); } /*============ STEP-4: Create Target (without Reinitialize) =========== */ var targetComponent = dataFlowTask.ComponentMetaDataCollection.New(); CManagedComponentWrapper targetInstance=null; try { targetComponent.ComponentClassID = "ZappySys.TrashDestination"; targetInstance = targetComponent.Instantiate(); targetInstance.ProvideComponentProperties(); targetComponent.Name = "MyDestination"; targetInstance.SetComponentProperty("SaveDataToFile", true); targetInstance.SetComponentProperty("FilePath", @"c:\temp\dump.txt"); targetInstance.SetComponentProperty("OverwriteFileIfExists", true); //--- Trash destination doesnt have connection but incase destination uses connection... set below way //if you have connection then set this way //var conn2 = p.Connections.Add("....."); //Creation name i.e. ZS-HTTP //conn2.Name = "MyConnection2"; //conn3.ConnectionString = "Url=https://httpbin.org/get;CredentialType=Basic;UserName=test;Password=test123"; //if (targetComponent.RuntimeConnectionCollection.Count <= 0) //{ // var dtsRuntimeConnection = targetComponent.RuntimeConnectionCollection.New(); // dtsRuntimeConnection.Name = "Connection"; //} //sourceComponent.RuntimeConnectionCollection[0].ConnectionManager = DtsConvert.GetExtendedInterface(conn2); //sourceComponent.RuntimeConnectionCollection[0].ConnectionManagerID = conn2.ID; //make connection active before next step //targetInstance.AcquireConnections(null); } catch (COMException ex) { throw new Exception("Error Happened ==> " + targetComponent.GetErrorDescription(ex.ErrorCode)); } /*============ STEP-5: Connect Source to Target =========== */ //before we call reintializemetadata for dest .. lets attach src and dest so .. dest can use virtual inputs if needed var output = sourceComponent.OutputCollection[0]; //to make it simple lets pick first output but possible component can have more outputs var input = targetComponent.InputCollection[0]; dataFlowTask.PathCollection.New().AttachPathAndPropagateNotifications(output, input); /*============ STEP-6: Configure Target =========== */ try { //after connection + props set and source to target attached... call ReInitialize meta... it creates columns / output / input etc targetInstance.ReinitializeMetaData(); } catch (COMException ex) { throw new Exception("Error Happened ==> " + targetComponent.GetErrorDescription(ex.ErrorCode)); } /*============ STEP-6: Save Package =========== */ //* use below code to save to disk file var app = new Microsoft.SqlServer.Dts.Runtime.Application(); var filepath = @"c:\temp\demo.dtsx"; app.SaveToXml(filepath, p, null); /*============ STEP-7: Load Package =========== */ //--load from disk to memory p = app.LoadPackage(filepath, null); //*/ /*============ STEP-8: Execute Package =========== */ var status = p.Execute(); /*============ STEP-9: Print execution status / log =========== */ if (status != DTSExecResult.Success) { var errs = ""; foreach (var e in p.Errors) { errs = errs + string.Format("Source={0}, Err={1}", e.Source, e.Description) + "\r\n"; } throw new Exception("Package status was >> " + status + " >> " + errs); } Console.WriteLine("Execution Completed... Press any key to exit!!!"); Console.ReadKey(); } private static void Create_SSIS_Variable_Demo() { var p = new Microsoft.SqlServer.Dts.Runtime.Package(); p.Variables.Add("MyVariableName1", false, "User", "Some value"); } private static void Create_SSIS_Connection_Demo() { var p = new Microsoft.SqlServer.Dts.Runtime.Package(); var conn1 = p.Connections.Add("ZS-SFTP"); conn1.Name = "MySftpConnection"; conn1.ConnectionString = "Protocol=Sftp;ServerName=127.0.0.1;Port=0;LogonType=Normal;UserName=zstest;Password=zstest123"; } private static void Create_SSIS_Connect_Tasks_Demo() { var p = new Microsoft.SqlServer.Dts.Runtime.Package(); var SFTP_TASK = "ZappySys.SecureFtpTask"; var tsk1 = p.Executables.Add(SFTP_TASK) as TaskHost; tsk1.Name = "SFTP_Task1"; /*set some props - see Create_SSIS_Controlflow_Task_Demo */ var tsk2 = p.Executables.Add(SFTP_TASK) as TaskHost; tsk2.Name = "SFTP_Task2"; /*set some props - see Create_SSIS_Controlflow_Task_Demo */ //add link between task1-->task2 var pc = p.PrecedenceConstraints.Add(tsk1, tsk2); pc.EvalOp = DTSPrecedenceEvalOp.Constraint; pc.Value = DTSExecResult.Success; pc.LogicalAnd = true; //only useful if multiple inputs coming and you want all previous steps to be Green vs Any One Green .. if its any use LogicalAnd=False //If you need to connect with expression use below //pc.EvalOp = DTSPrecedenceEvalOp.ExpressionAndConstraint; //pc.Expression = "@SomeVariable == true"; } } } |