Introduction
![]() In our previous post we saw how to read API data in SSIS. This post we will cover how to call NetSuite RESTlet to read / write data in SSIS or ODBC Apps. For demo purpose we will use SSIS PowerPack REST API Task but concepts and many UI elements remain same for ODBC JSON Driver too. This article assumes you know how to write Netsuite RESTlet and you have obtained Credentials to call RESTlet from extranal app.
In our previous post we saw how to read API data in SSIS. This post we will cover how to call NetSuite RESTlet to read / write data in SSIS or ODBC Apps. For demo purpose we will use SSIS PowerPack REST API Task but concepts and many UI elements remain same for ODBC JSON Driver too. This article assumes you know how to write Netsuite RESTlet and you have obtained Credentials to call RESTlet from extranal app.
What is NetSuite RESTlets
NetSuite added a really nice feature to expose business data and workflows as API by writing Javascript functions which they call it RESTlets. You can secure and customize these restlets as per your need.
You can automate CRUD (Create /Read / Write / Delete) operations in NetSuite by writing special functions in JavaScript and expose those functions as API URL which can be called by any external Systems (i.e. SSIS Packages , ODBC Apps like Power BI, Informatica, SSRS).
RESTlet can be secured few ways such as OAuth 1.0 and OAuth 2.0 authentication. We will cover both approach briefly in this article. You can choose any one as per your need
Prerequisites
Before we perform the steps listed in this article, you will need to make sure the following prerequisites are met:- SSIS designer installed. Sometimes it is referred to as BIDS or SSDT (download it from the Microsoft site).
- Basic knowledge of SSIS package development using Microsoft SQL Server Integration Services.
- Make sure ZappySys SSIS PowerPack is installed (download it, if you haven't already).
- (Optional step). Read this article, if you are planning to deploy packages to a server and schedule their execution later.
Creating NetSuite RESTlet / Obtain OAuth Credentials (Client ID and Secret)
Below video shows how to obtain necessary credentials to call Netsuites API (RESTlet).
At mark 4:30 seconds it will show you How to use OAuth 2.0 for calling RESTlet
Create NetSuite RESTlet Connection
There are few ways to authenticate NetSuite RESTlet. If you are using ZappySys Products then it makes it super easy to use either approach. Lets look at both approaches.
Using OAuth 2.0 (Recommended)
As per above video if you obtained Client ID and Secret for OAuth 2.0 you can follow below steps to configure OAuth connection to call RESTlet.
What you need to use OAuth 2.0.
- Your Account ID (it goes in URL)
- Your Client ID and Secret (Obtained from Netsuite Portal) – See above video Mark 04:30
- Register Redirect URL in NetSuite portal (we recommend you use https://zappysys.com/oauth as call back Url for Automatic Code extraction)
Steps to configure OAuth Connection
- Right click on Connection Panel and choose Choose “New Connection..”. Select ZS-OAUTH type
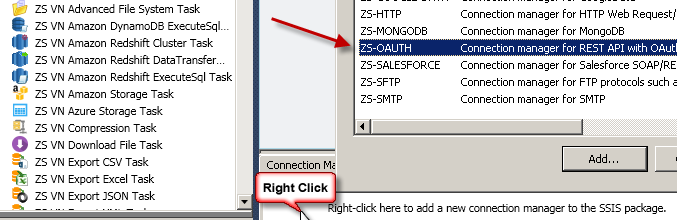
Create new SSIS OAuth API Connection Manager
- Enter following things
————————-
On General Tab
————————-
ClientID and Secret: <get it from NetSuite>
Authorization URL: https://<accountID>.app.netsuite.com/app/login/oauth2/authorize.nl
Token URL: https://<accountID>.suitetalk.api.netsuite.com/services/rest/auth/oauth2/v1/token
Scope: restlet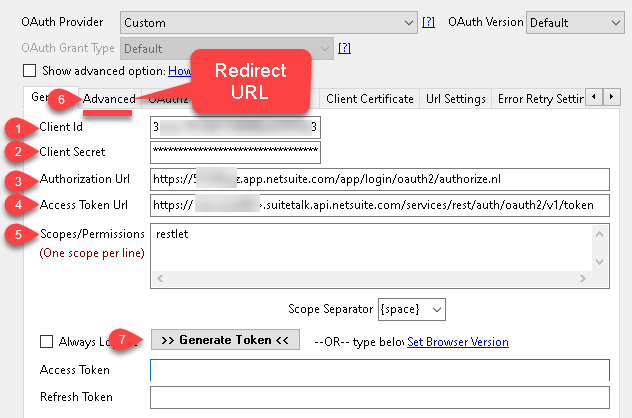
Configure NetSuite OAuth 2.0 Connection for API call
————————-
On Advanced Tab
————————-
Callback / Redirect URL: https://zappysys.com/oauth (this must be entered same way in NetSuite Portal)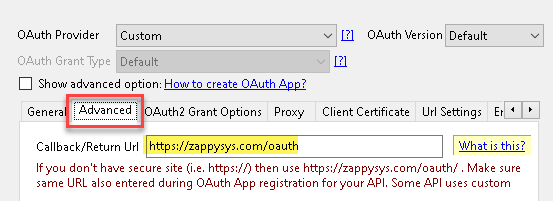
OAuth2 Connection – Callback / Redirect URL
- Now go back to General Tab and click Generate Token button
- Follow login screen and try to finish the flow. At the end it will generate Tokens and populate on UI
- Click OK to save
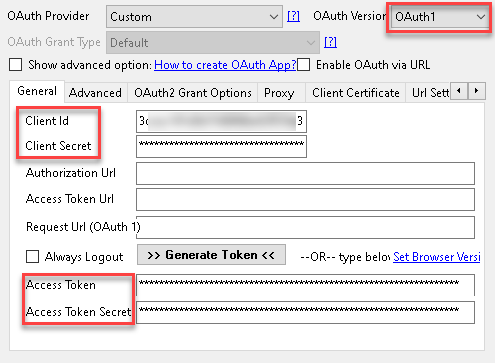
Using OAuth 1.0
Another approach is use OAuth 1.0 (Older version). If you have enabled OAuth 1.0 in NetSuite then follow below steps (Create connection is same as before).
- Setup General Tab and Advanced Tab as below.
On ==== General Tab====:
Enter ClientID, ClientSecret, AccessToken, AccessToken Secret
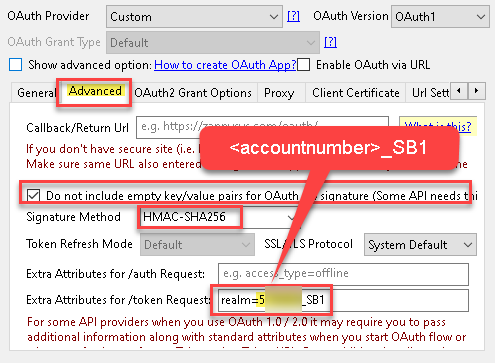
On ==== Advanced Tab ====:
Check Do Not Include Empty Key/Value Pairs
Select Signature Method as HMAC-SHA256
For Extra Token Attribute enter realm=<your-account-number>_SB1 - Click OK to Save
Call NetSuite RESTlet in SSIS
- Create a new SSIS Package
- Drag REST API Task from SSIS Toolbox

- Double click the Task to configure
- Select URL from Connection
- From Connection dropdown select OAuth connection we created in the earlier section (either OAuth 1 or OAuth 2)
- Enter the URL as below. Assuming you copied URL from NetSuite Replace script ID and account number
https://<account-number>-sb1.restlets.api.netsuite.com/app/site/hosting/restlet.nl?script=<scriptid>&deploy=1Enter <account-number>
Enter <scriptid> - Change Method to POST if your script supports Parameters (Else you can supply id=xxxx and recordtype=xxxxx in the URL for GET request)
- If its POST request then chnage ContentType to ApplicationJSON (application/json)
- Enter your Input in the body. In below example our RESTlet takes sql query as input so we enter just one parameter named query but you can have different parameter(s)
1Syntax: { param1_name : <value> , param2_name : <value> .... } - Now click Test see everything works
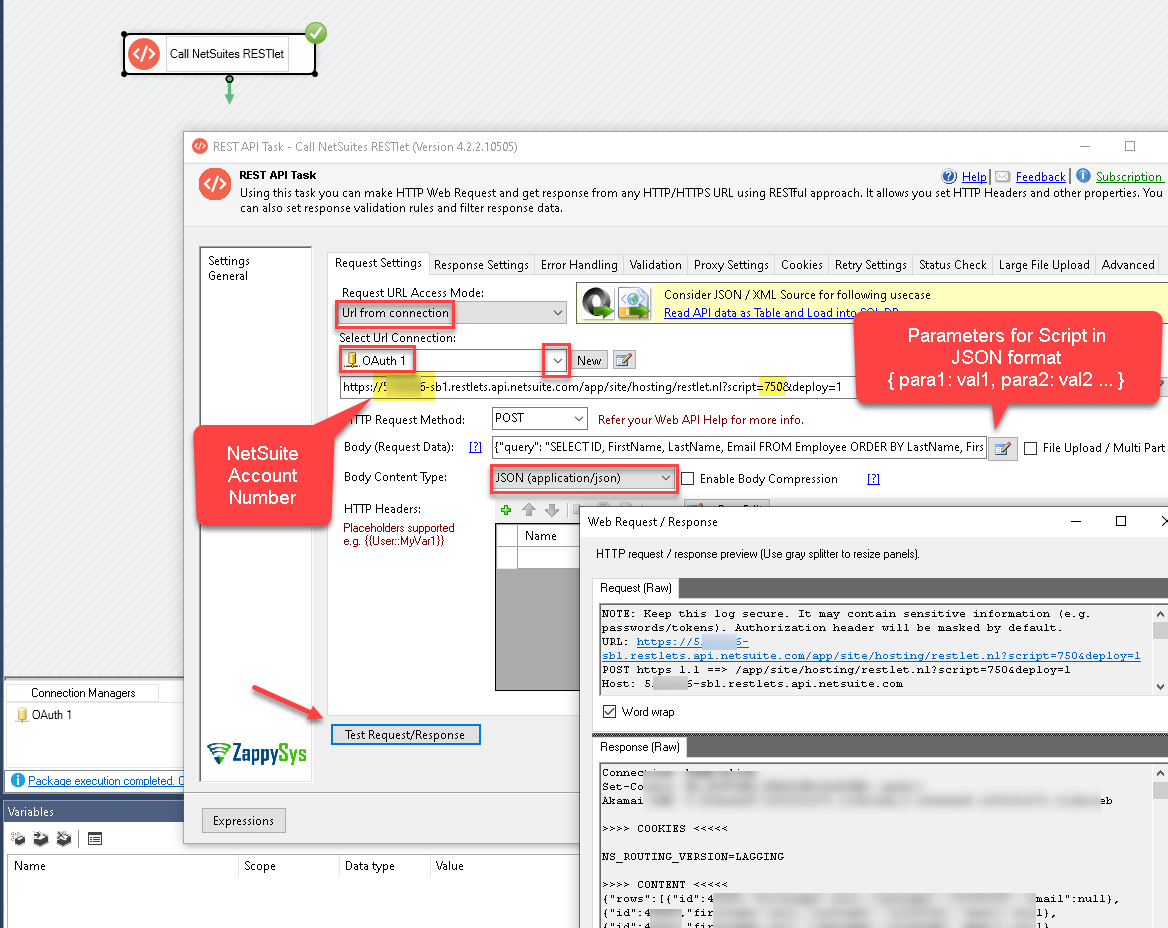
Calling NetSuite RESTlet in SSIS (Using REST API Task)
Conclusion
We saw how easy it is to call NetSuite RESTlets or other NetSuite API in SSIS / other BI Apps using ODBC Drivers provided by ZappySys. Download SSIS PowerPack and try your self see how easy it is to consume virtually any API in SSIS.